Sometimes a few of your data fields will be in one column, stored as text with a delimiter (e.g. – , / _ ). Tableau will read this as one value and to have it as more than that you need to tell Tableau to split the field. There are three ways you can do this in Tableau: through the data source, through the data pane, or using a calculation.
The example I’m going to talk through here is splitting a field containing Category abbreviation, Sub-Category abbreviation and Product ID into 2 columns (getting rid of the product ID as we have this in another field already).
Method One: Through the data source
When you’re in your data source, click the arrow next to the field name of the field you’d like to split (Figure 1: 1), then on the menu click ‘Custom split’ (Figure 1:2). This gives you move control over the split than using ‘Split’; Tableau’s auto-split function.
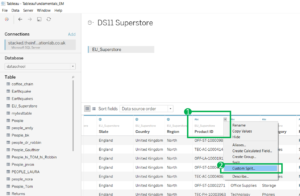
Figure 1. First steps in Method One
This opens up the Custom Split menu. From here, input the delimiter that is cutting your data – in this case a hyphen or dash ‘-‘. You can also select whether it reads from the beginning of the value (First), backwards from the end of the value (Last) or just uses the whole value (All) – in this case we don’t need the Product ID so ‘First’ (Figure 2).
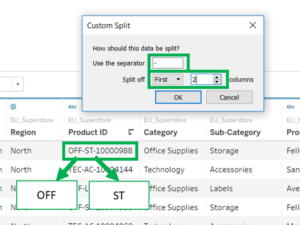
Figure 2. The ‘Custom Split’ menu
This creates new fields containing the split out fields, whilst still keeping the original field for reference. Double click on the name of these fields to rename to something more suitable (e.g. here they’ve been renamed Category Abbr and Product Abbr) – Figure 3. These are now ready to use!
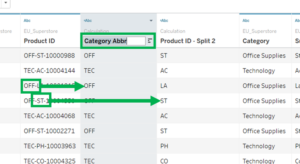
Figure 3. New fields that need to be renamed
Method Two: Through the data pane
In the data pane, right click (or click the arrow at the end of the pill) on the field you’d like to split (Product ID) and select Transform > Custom Split (Figure 4).
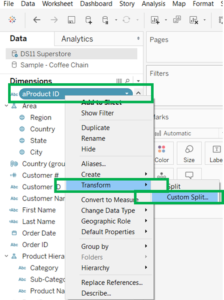
Figure 4. Selecting ‘Custom Split’ from the Data Pane
This brings up the same menu as in Method One (Figure 2) where you specify the delimiter and column format of the split. However, this time, rename the field by right clicking (or clicking the little arrow at the end) and selecting rename (Figure 5) from the field within the Data Pane.
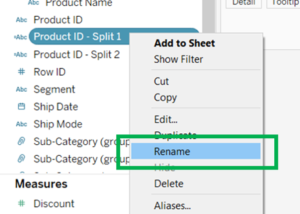
Figure 5. Rename from the Data Pane
Method Three: Using a calculation
You can also split the field by creating a calculated field. From either the Data Source (Figure 6: A) or the Data Pane (Figure 6: B) views, right click on the field (heading or pill) and select Create > Calculated Field (Figure 6).
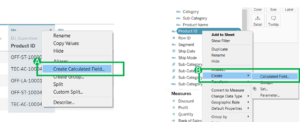
Figure 6. A – Calculated Field creation from Data Source. B – Calculated Field creation from Data Pane.
The following calculations can be inputted (Figure 7: A), where it splits the field [Product ID] using the delimiter “-” from the first column, all whilst trimming any ‘white space’ – i.e .additional information.
Tableau will tend to automatically create this as a string field, and whilst you can change the field type later, you can also use the second formula (Figure 7:B) to create new integer split field.
At the same time as creating the Calculated Field you can rename the field also by typing in the top left hand field name box.
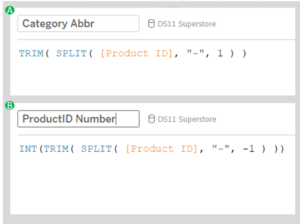
Figure 7. A – Formula for creating a custom split field. B – Formula for creating a custom split integer field.
You can also do this in Alteryx as part of the data prep – see my post about how to do this here.
