


After a full day of learning about macros in Alteryx, I have decided to spread my new wisdom to the masses and walk through how to create a standard, an iterative and a batch macro. This step-by-step tutorial will take you from zero to hero (or help troubleshoot if you're having issues) so settle in, we're in for a long (but hopefully enjoyable and informative) ride.
What even are macros?
Before we can start going through how to create macros, I thought it would be worthwhile explaining what a macro does. A macro is essentially a tool which contains a number of tools. Some of the tools that we have in Alteryx today are actually macros, created by Alteryx as a result of people frequently using them. Therefore, macros are effective if you're going to be using the same set of tools multiple times to do the same thing. For example, this might be within an organisation if a number of employees are creating similar workflows which contain sections with the same tools. A macro could save people the time of recreating the sections individually and will also reduce the likelihood of human error there. Alternatively, a macro might be used if the same section of tools is being used multiple times in a single workflow. This not only simplifies the visual complexity of the workflow but can also increase efficiency, and decrease risk of human error again!
What does a macro look like?
The macro itself...
The macro within the workflow...
So what exactly are the components of a macro?
- An output tool. A macro is built in a separate workflow and has its own output tool which will then feed into the main workflow. Sometimes the macro might have multiple output tools which then feeds out with various connectors like you see on the right hand side of a join tool.
- An input tool (most of the time - in all of my examples you require one).
- A control parameter (for batch macros). This controls what is being read into the macro.
These are the core components. The rest is up to you depending on what you're wanting to do with the data. Also, if you haven't done apps in Alteryx yet, I'd recommend getting familiar with them first as you'll often use the interface tools to assist in your macro design.
The Macro Repository
The macro repository is where your macro will live once it's created. It comes up as a tab in Alteryx once something is in there, like how you have the 'developer' tab or 'preparation' tab at the top of your screen. But first, you need to create the repository itself so let's do that.
Step 1: Create an empty folder somewhere safe for your macros to be housed. I've got it in a google drive folder for example.
Step 2: Go to options in your tool bar > User settings > Edit user settings. A pop-up window will appear.
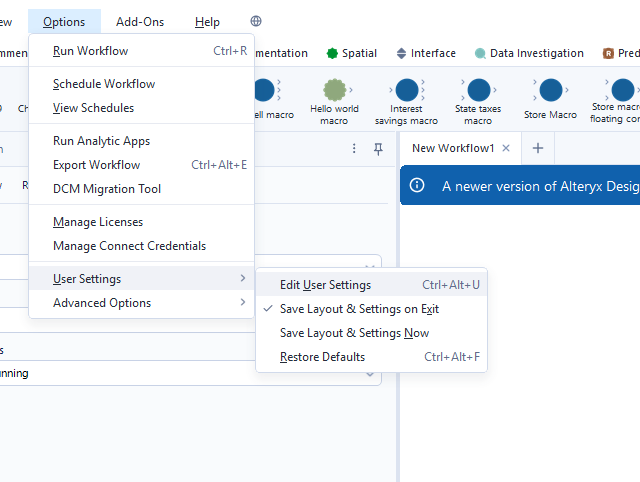
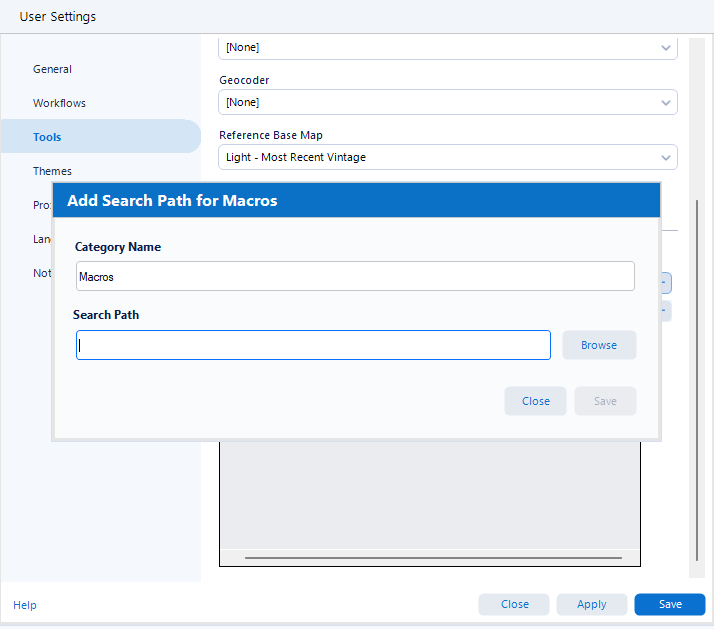
Step 3: Go to the tools tab and scroll down to the macros section. Then click the little plus icon to add your macro with your new file path to your folder.
Now you've got a repository created! It probably won't be showing up in your tabs yet so don't worry - that's because it's empty. We better find something to add to it then!
The Standard Macro
Your standard macro is probably what you're thinking of since I described it in the introduction. It is very simply a set of tools which can then go into your workflow in the form of a little macro package. In this example, we're going to create a calculate age macro. This is perhaps a less simple starter macro but it gives a better insight into what a macro can do. I'll start by doing the more 'standard' part and then adding a little more fun!
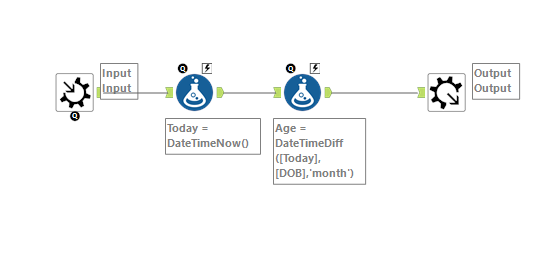
Step 1: Create a new workflow. Macros always exist in their own workflows and then can get added into new workflows where they get used.
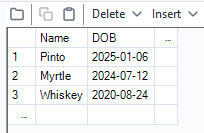
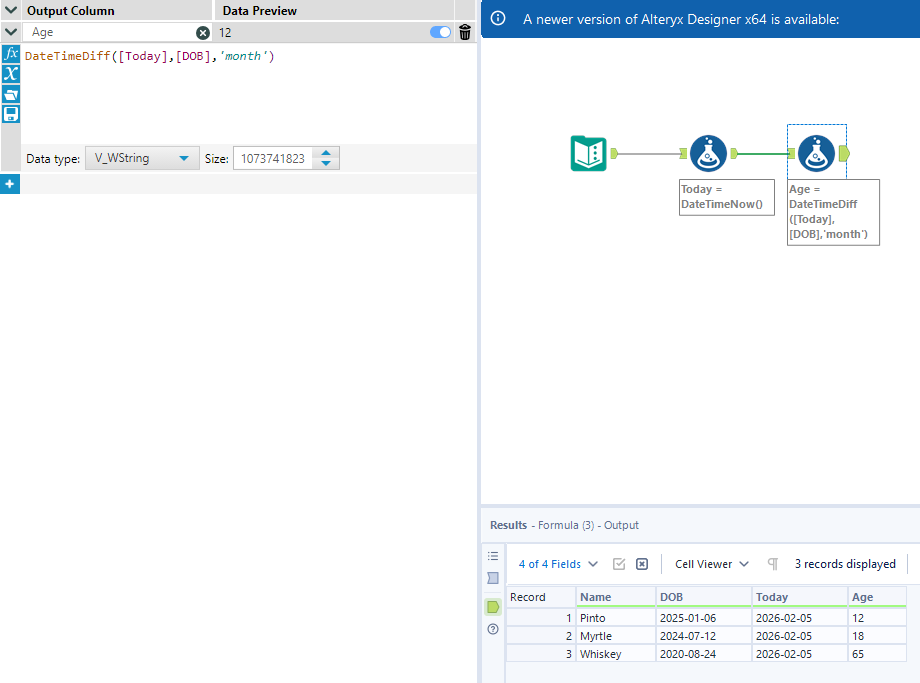
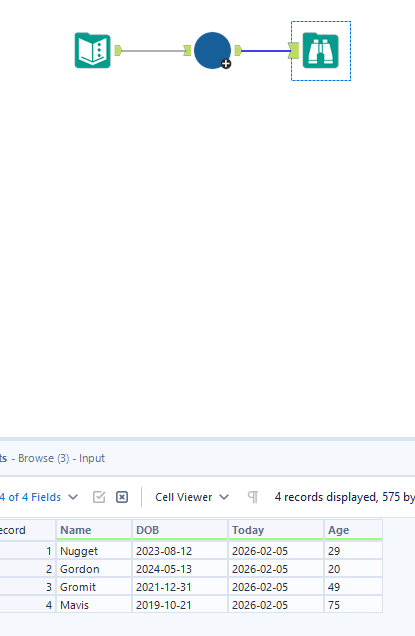
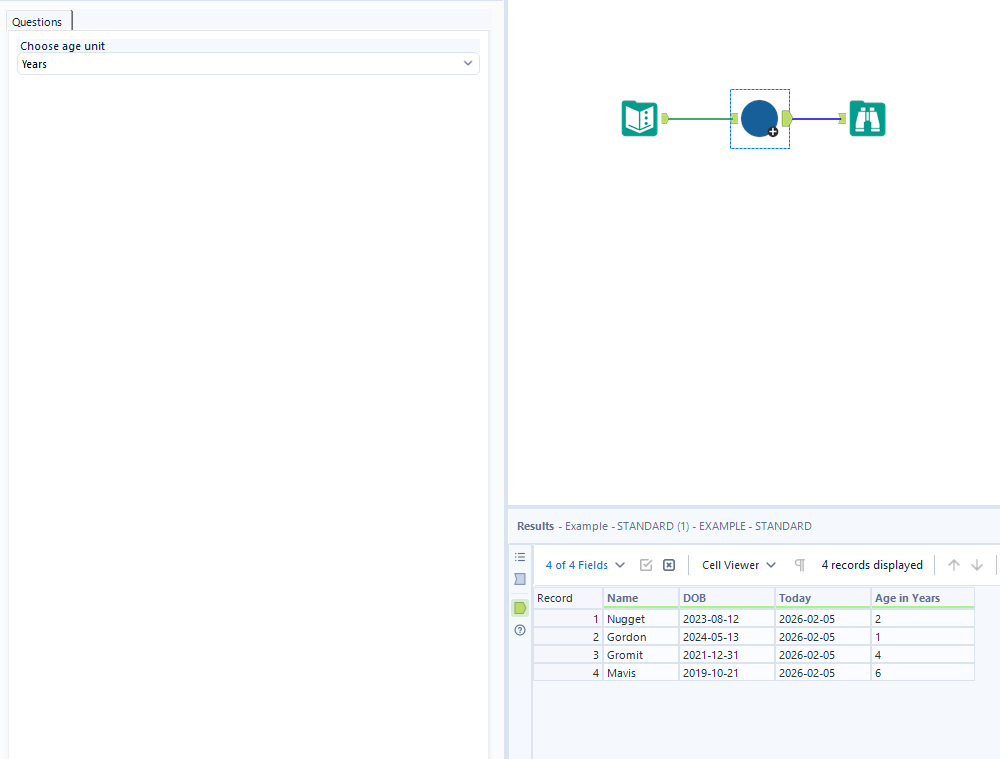
Step 2: Add a text input. This gives the macro a template to work from. For this example, I've added the names of my cats and some imaginary dates of birth as we don't actually know their birthdays.
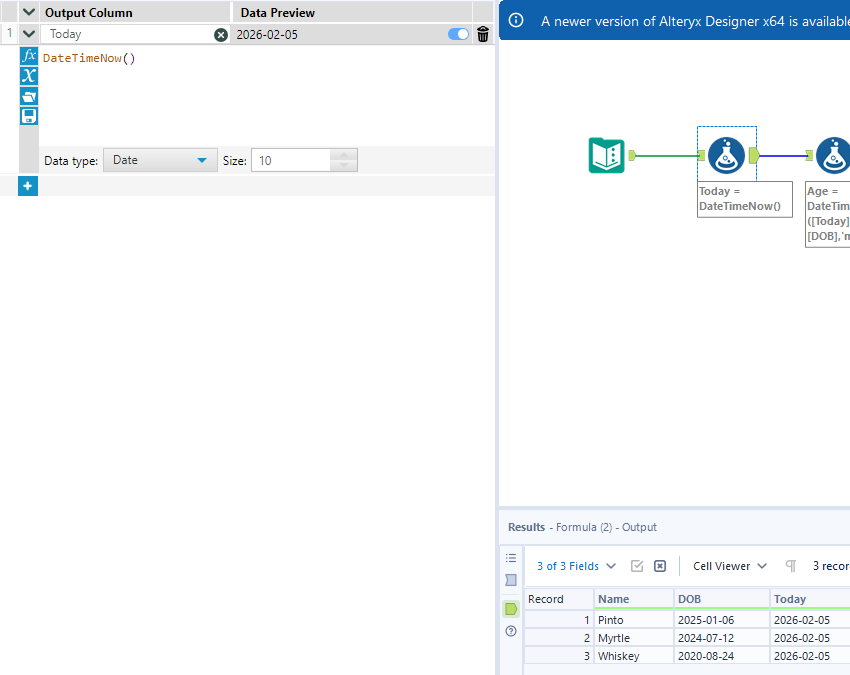
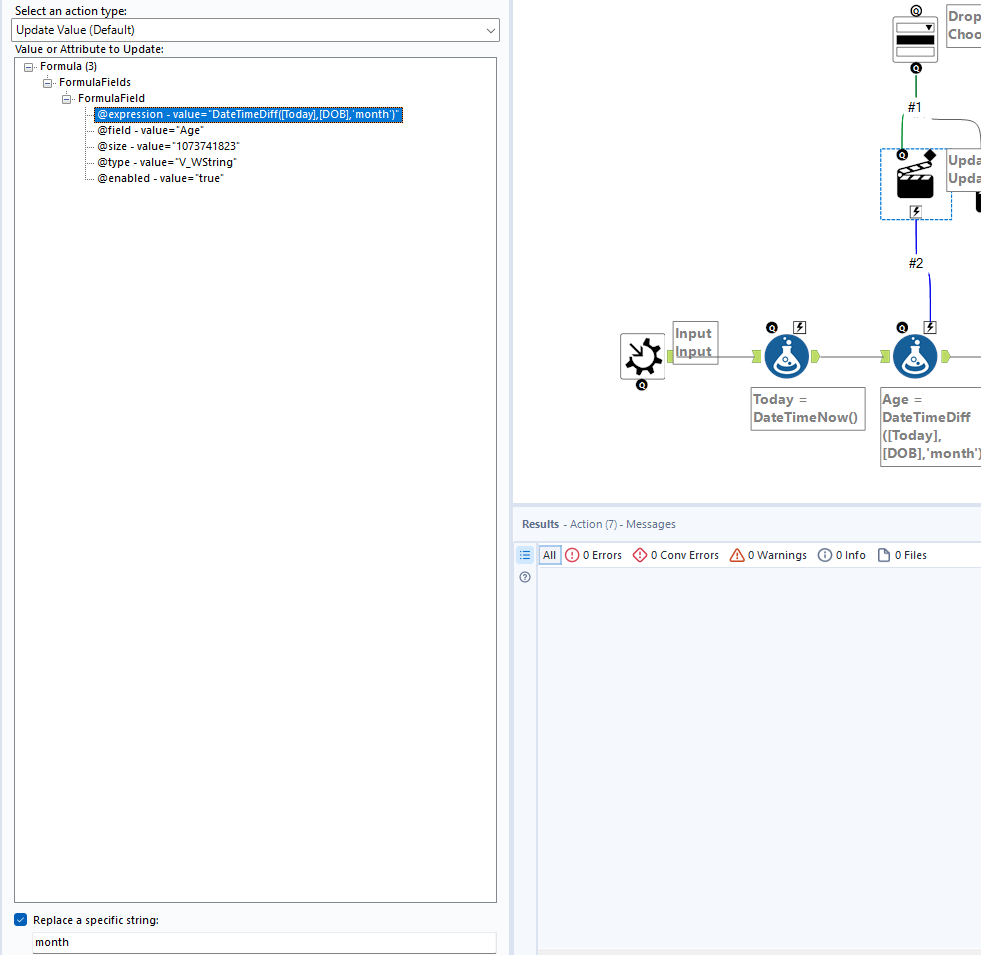
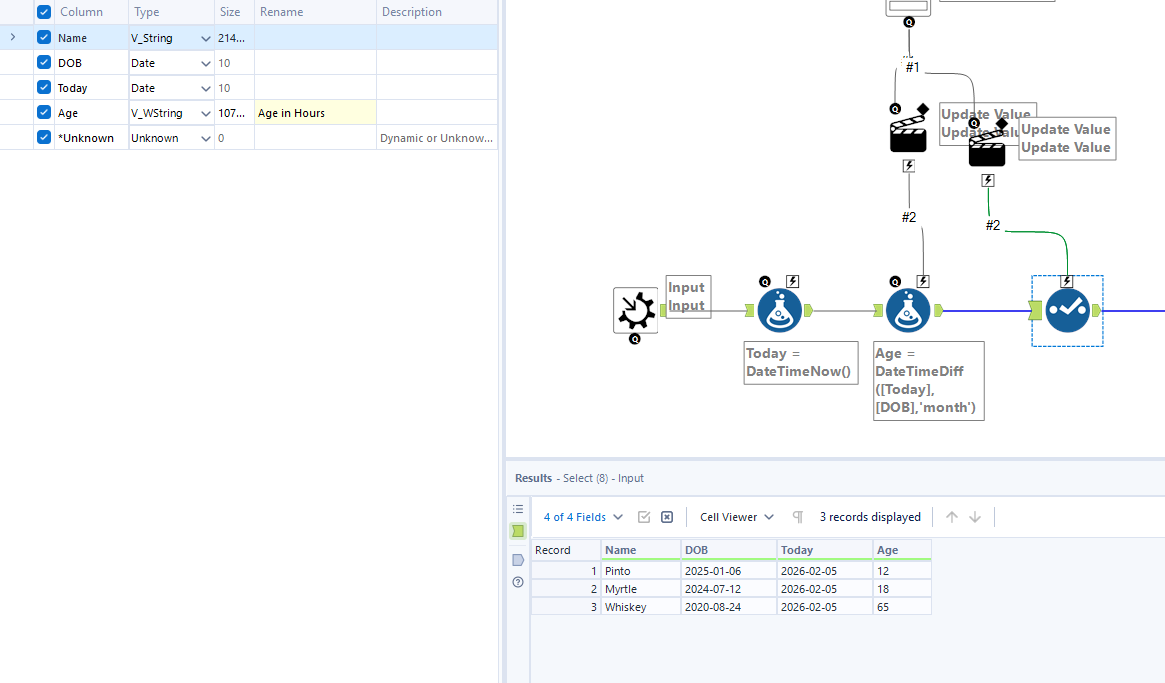
Step 3: For this particular example, I've then added a 'today' column and created a formula to establish their age (for some reason my initial response was to use months but we will be changing this later!) using a datediff function.
Step 4: Add your macro output and replace your input with a macro input tool. These can be found in the 'interface' tab.
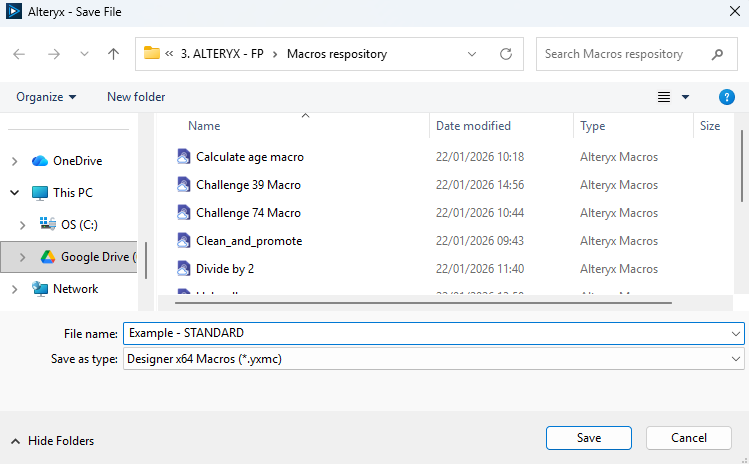
Step 5: Save it all! Make sure that it's being saved in your macros repository as a macro file. The file name that you save it as will be the name that comes up in your repository so I would recommend calling it something that makes sense. Don't use the examples that I have in the screenshot because I have no idea what many of them do!
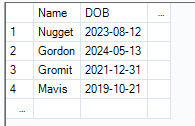
Step 6: Use your macro in a workflow. I've added some of the chickens to this example text input (sadly no longer with us) to show that it works with different data too, as long as the field names are the same. I then added my macro and a browse tool and you can see how it all works.
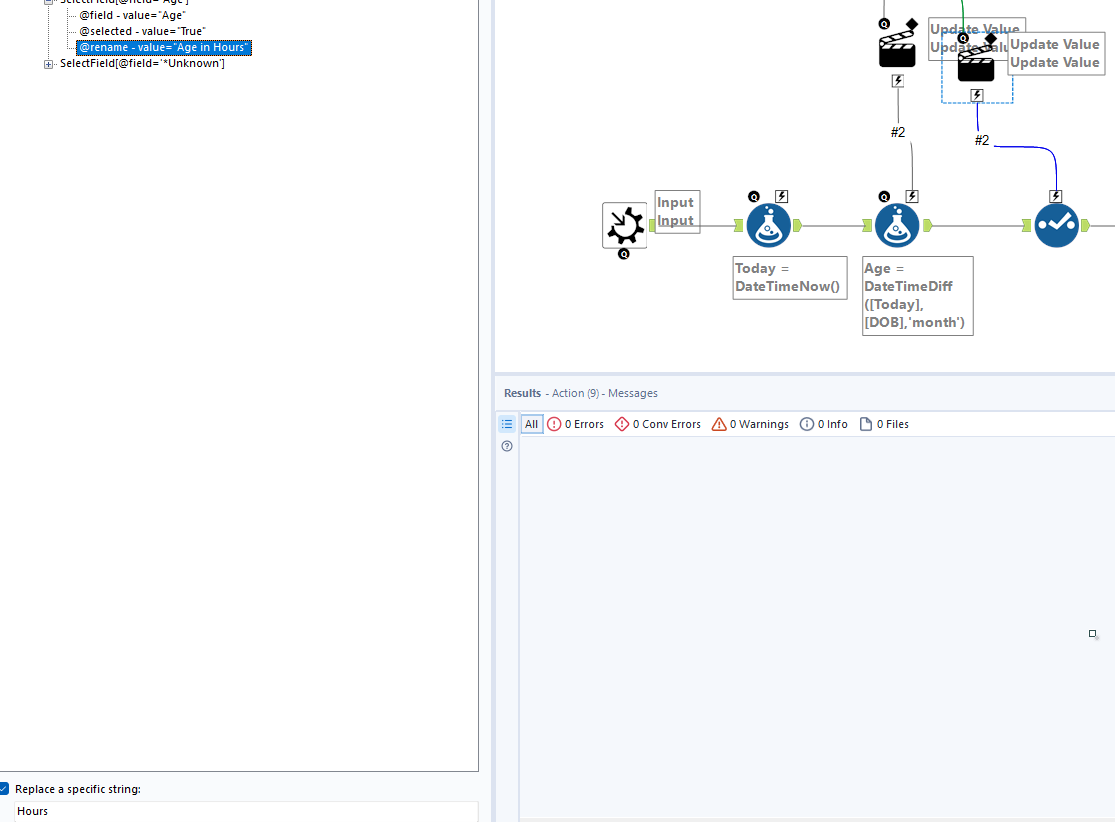
Step 7: Add a little fun to your macro so that you can glean more from it. I've added the option to choose what time unit the age will be in, and added that to the header to make it clear. This is the app bit and I have glossed through it here so if you're a little confused, head to some other blogs and learn a bit more about that if you're interested in it. I'd recommend learning more about apps as they make things like this more fun!

The Iterative Macro
An iterative macro is like your standard macro but it repeats until a specified stop point. Again, you'll have to create a new workflow but there are a few extra things you have to do as well to ensure it all works smoothly. I'd recommend creating the macro as if you'll only be running it once at first and then after that's all done, you can add in the iterative section. To have a more interesting example, I'm using the macro section of Alteryx Challenge 108. Feel free to follow along with it but I won't take you through how to get the final answer required!
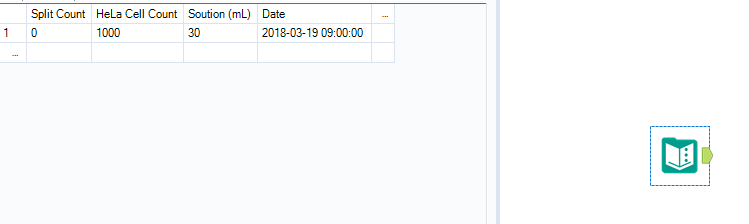
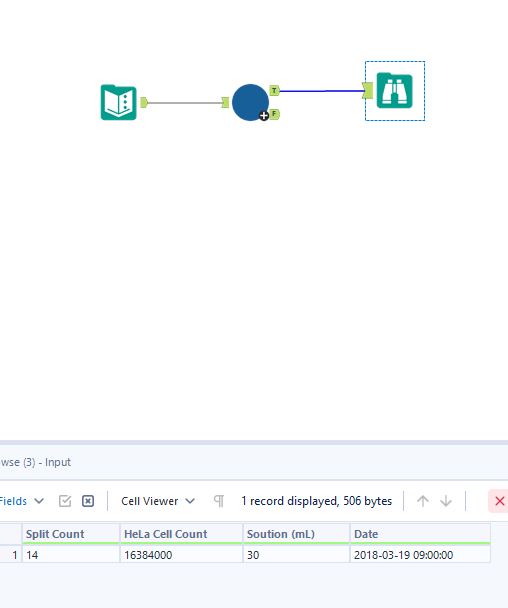
To set the scene, the challenge introduces information about HeLa cells and puts forward a scenario where you're a researcher needing to know how long it will take until the cells have reached maximum density within a solution. You have a 30ml solution with 1000 cells within the solution on day 1, each dividing within a 23 hour period. Maximum cell density is 400,000 cells per 1ml so you need to work out when there will be more than 12,000,000 cells in the solution.
Step 1: Open up the challenge, copying the record with headers and pasting that into a new workflow.
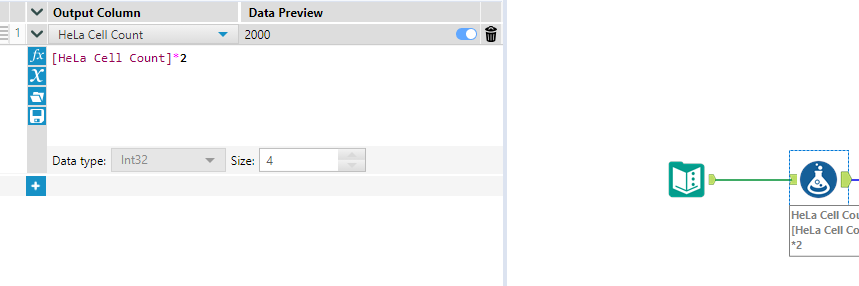
Step 2: Add in the multiply by 2 formula to simulate cell division.
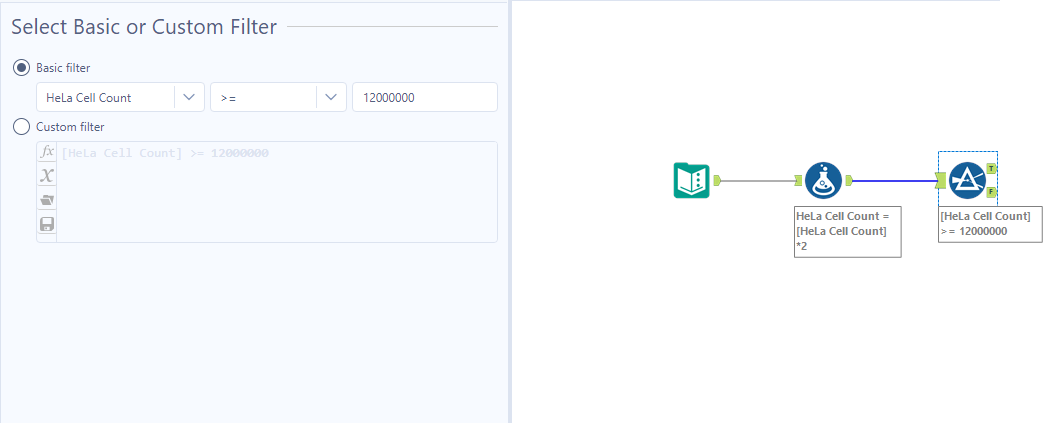
Step 3: Add in your filter to see if the iteration has met your requirement.
Step 4: Add your macro output and input tools. I'd recommend labelling your anchors with abbreviations so that you know which each anchor represents.
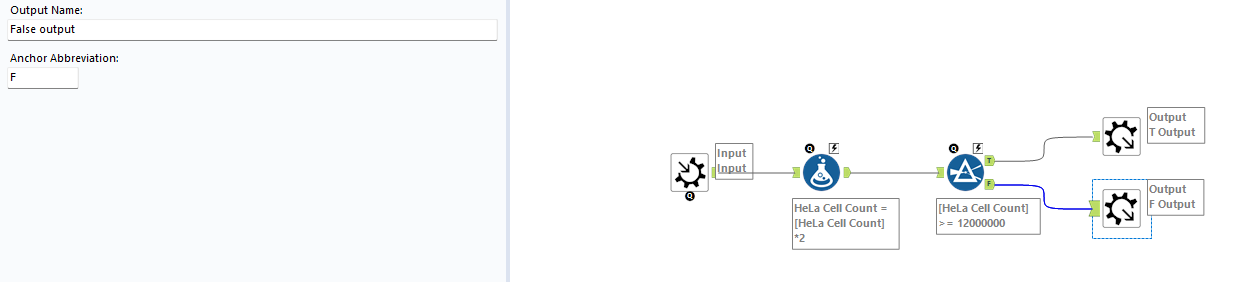
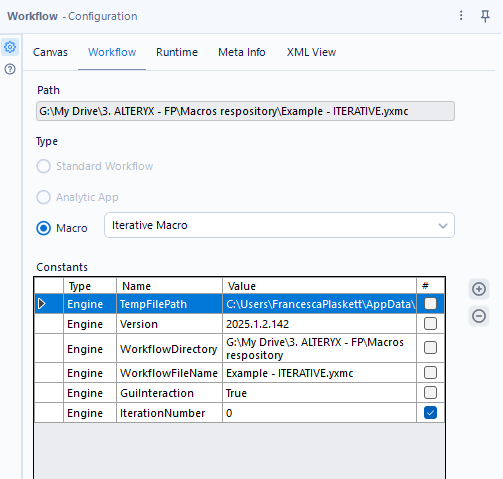
Step 5: Make your macro iterative by going to your workflow configuration. If you're not sure where that is, left click on the white space of your canvas and it should pop up on the left of your screen.
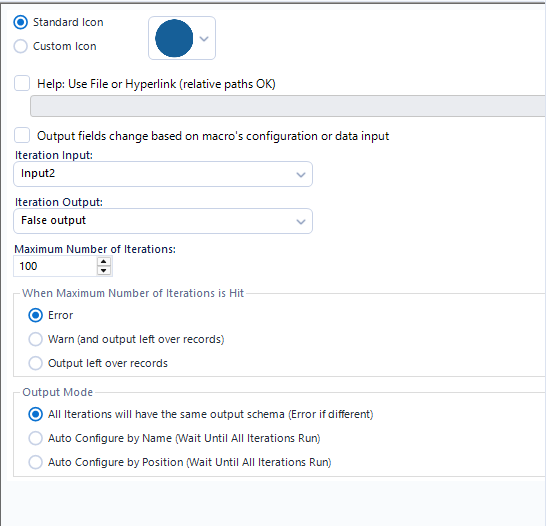
Step 6: Set up the iterative part of the macro. Go to View > Interface designer. It should pop up next to your workflow configuration. Then make sure that your iteration output is set to whatever is coming out of your false filter (I called mine False output). Depending on however many iterations you think you'll need, you can also change the maximum value in this interface. This is also where you can change your icon design if you want to make it more exciting!
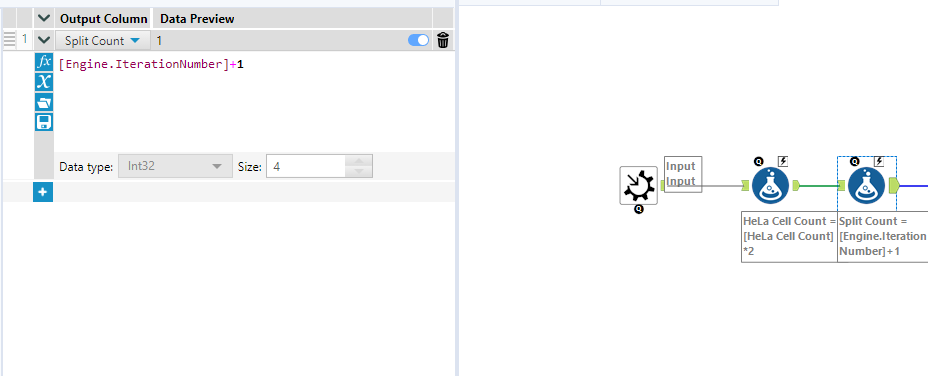
Step 7: Add iteration number to your output. As there is already a split count column, you can amend that according to the engine iteration number using a formula tool. When one iteration has occurred, the iteration number will be zero (this will never make sense to me) so I'd recommend adding one as this will make life easier later in the challenge.
N.B. You can only add this to your macro workflow as there is already a column in the input data for split count. If there wasn't, you'd need to add it after the true filter as you need your iterative output (false output that's going back into the input) to have the same fields as the original input.
Step 8: Save it all and put your macro into your challenge workflow. You should see that 14 iterations need to occur before the number of cells in the solution exceeds 12000000.
Now try to complete the rest of the challenge on your own!
The Batch Macro
The batch macro is, in my opinion, the most difficult macro to get your head around. This is mainly because trying to find examples of batch macros is quite tricky and therefore they're harder to describe! From my understanding, a batch macro is like an iterative macro but it creates separate outputs for each iteration which are then unionned together.
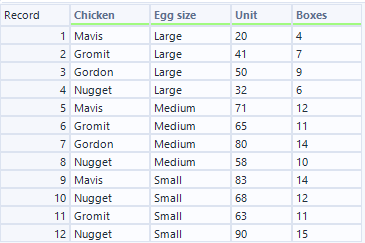
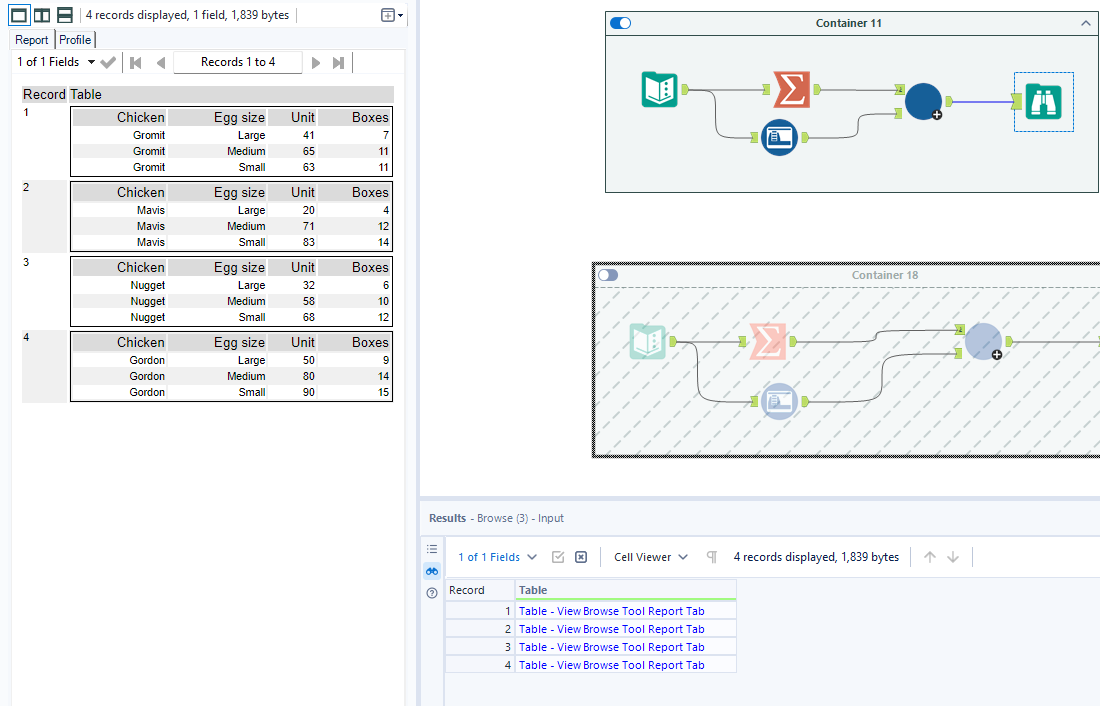
In this example, I've got a text input of chickens (I'm staying on theme), the size of egg and how many they've laid. I want to use the batch macro to create a separate table for each chicken. Similar to the iterative example, I'd recommend starting by creating one iteration and then transforming into the macro, although I will explain after how to do it slightly differently.
Step 1: Create your text input.
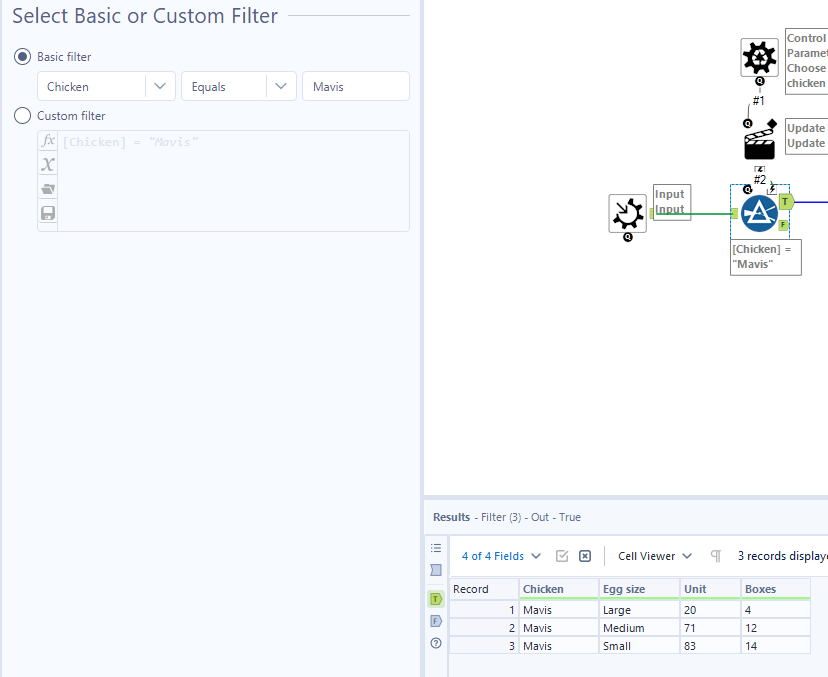
Step 2: Filter for a specific chicken.
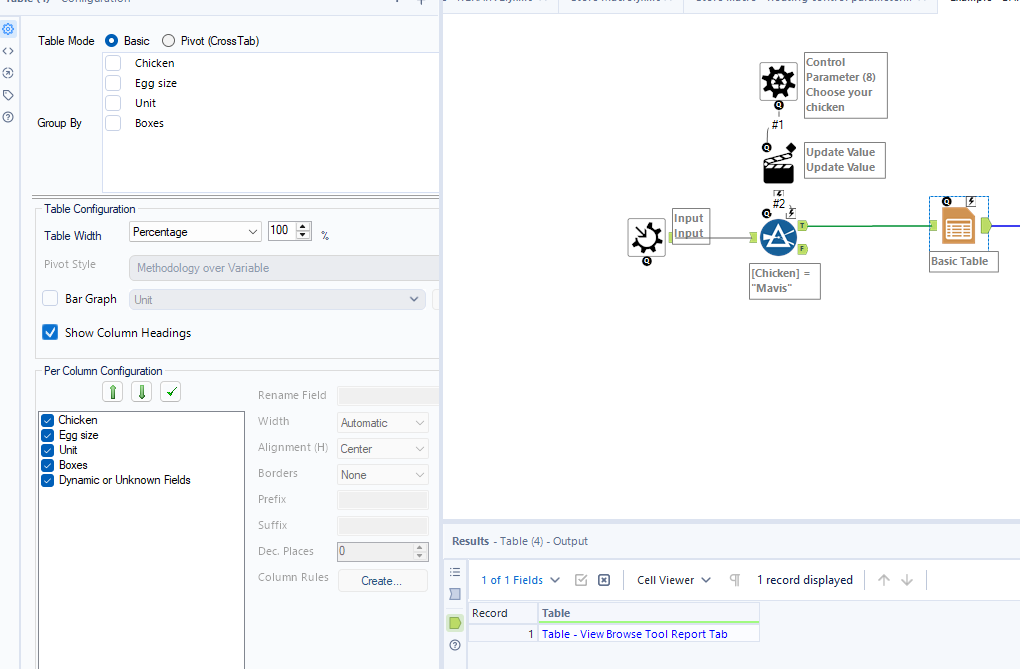
Step 3: Create your table by adding the basic table tool from the reporting tab. Then add a browse tool so you can see that your output is working.
Step 4: Convert it all into a macro. Change your output and input into macro tools.
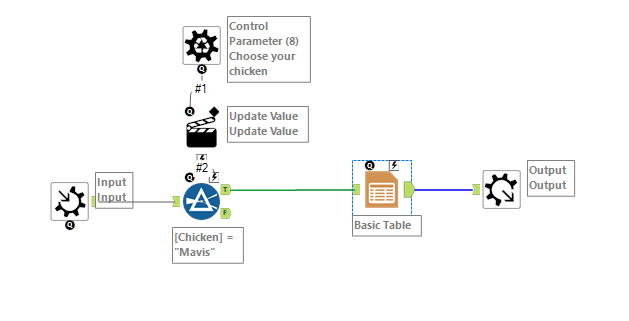
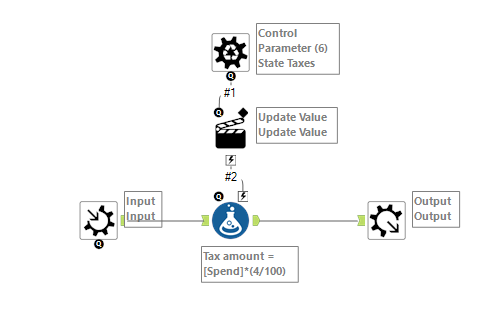
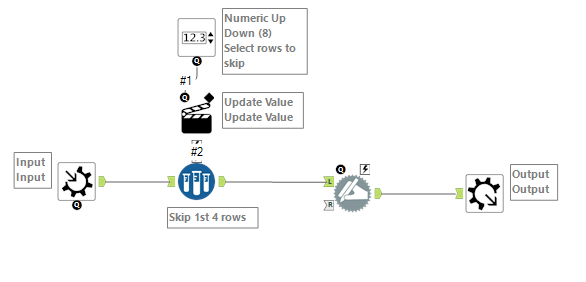
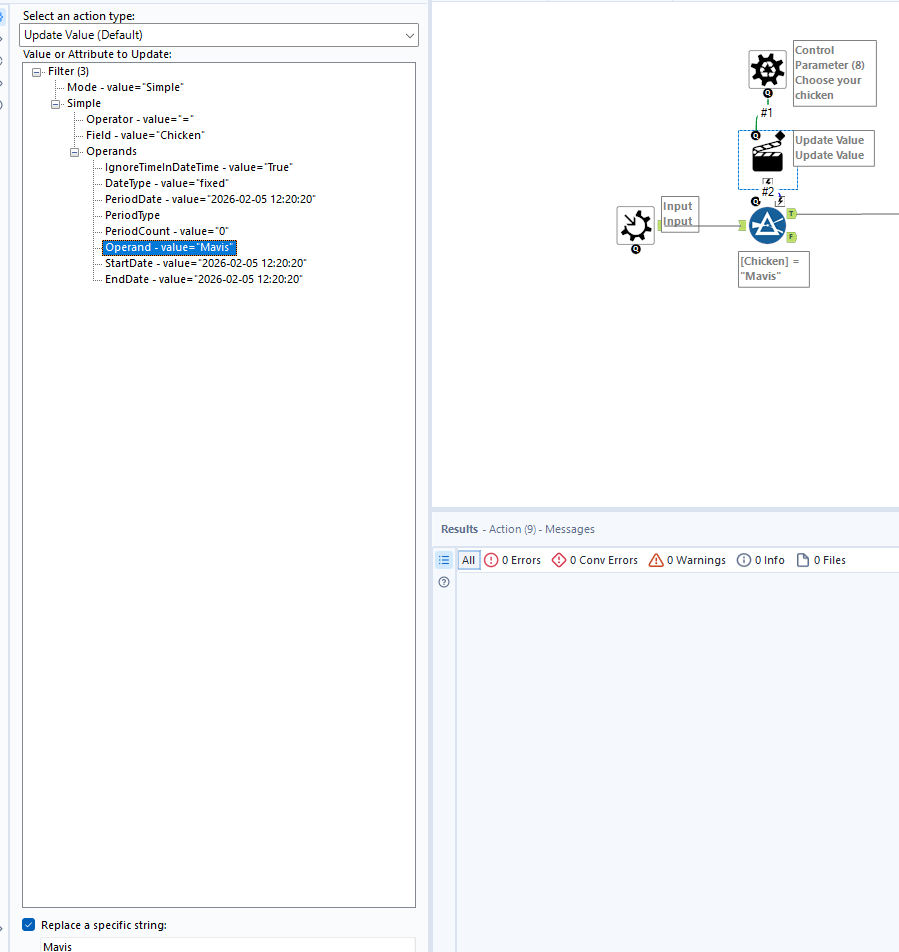
Step 5: Add your control parameter to edit your filter.
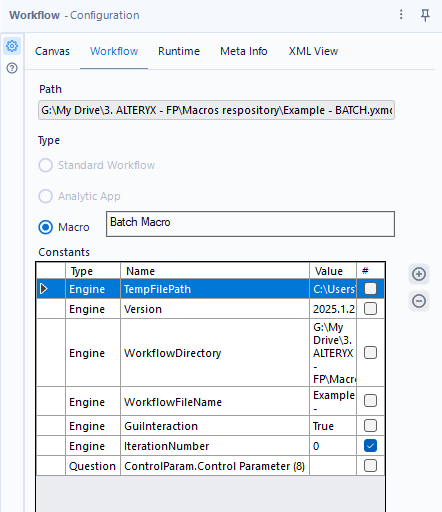
Step 6: Check that the macro is set up as a batch macro in your workflow configuration. It should do this automatically though when you add your control parameter.
Step 7: Save the macro and add it to your workflow. You need one input which is for your control parameter (identifiable by the ?), controlling how many times the iteration runs. I use a summarise tool for this. Then you need another input which is the input data being run.
The Alternative Batch Macro
As mentioned above, there is an alternative to using the iterative formatting to set up a batch macro. It just makes more sense in my head to do it using the filter method as I like being able to see how it works for one iteration, but this new way is probably simpler.
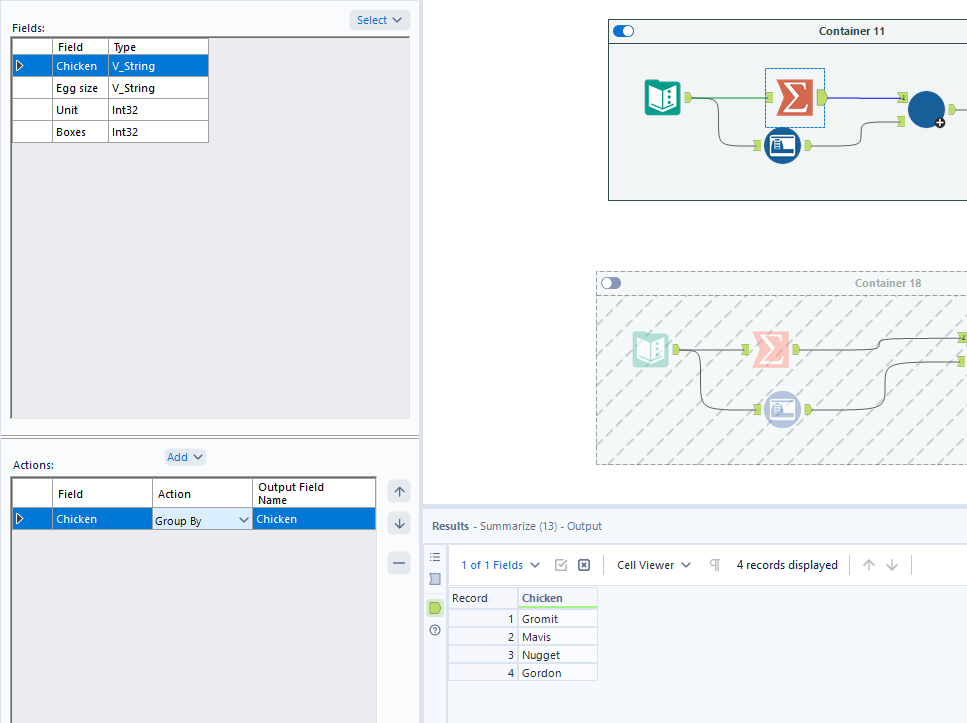
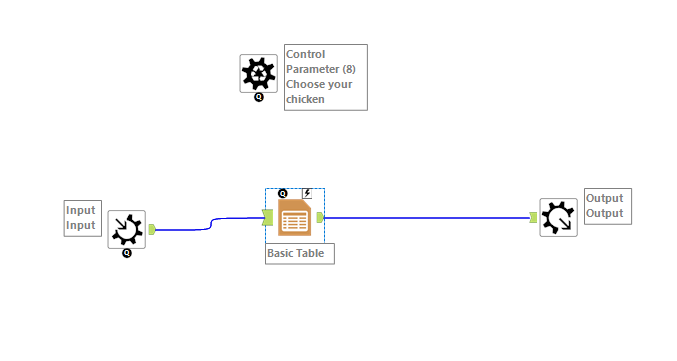
Instead of using the filter, like in step 2, you can just add the basic table directly into the next step. Then continue with the macro inputs/outputs but set up your control parameter so that it's floating in the workspace.
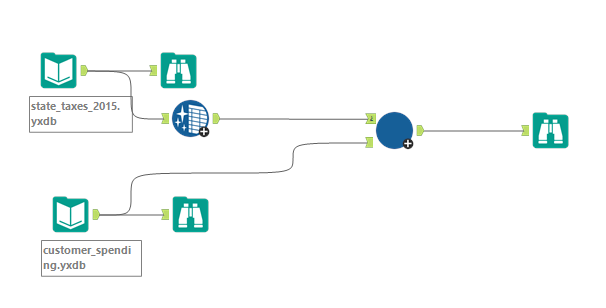
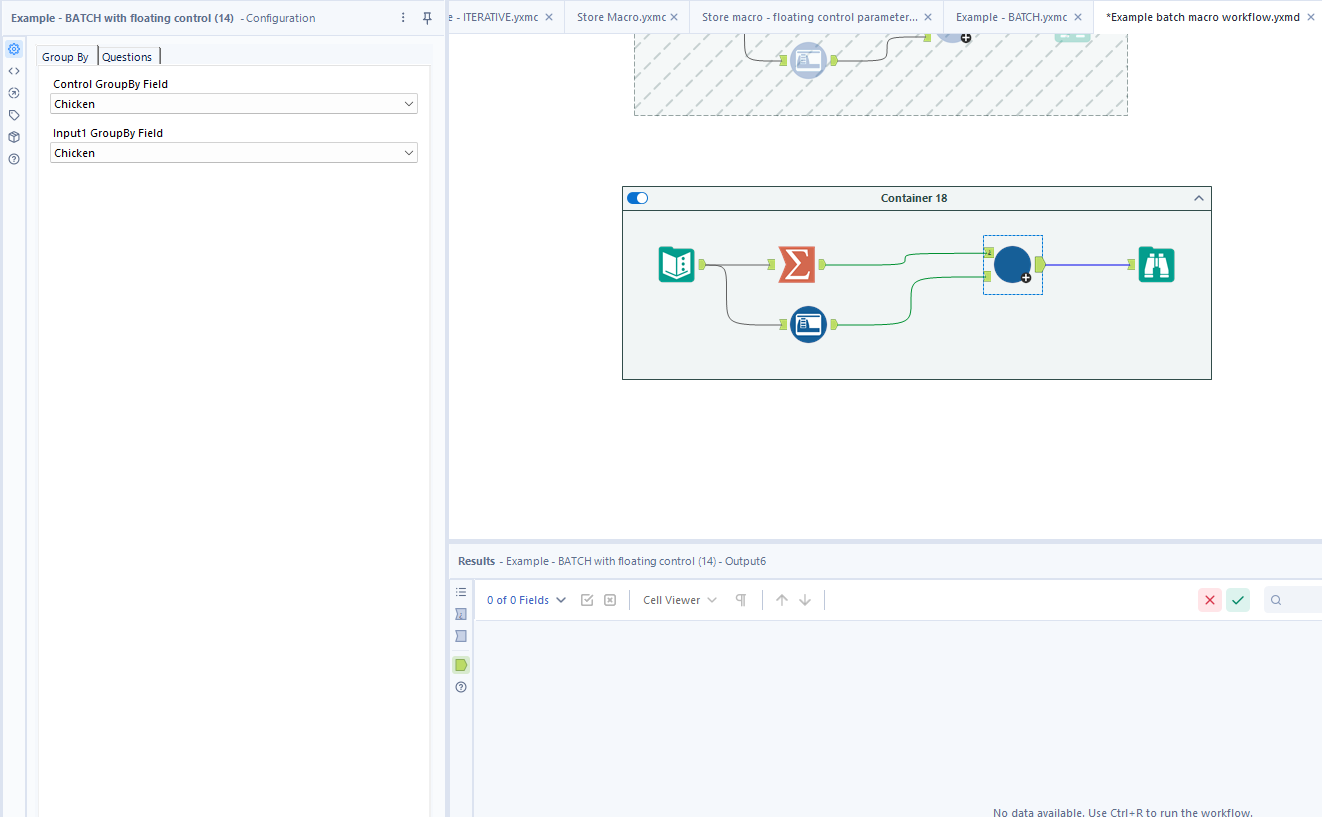
The key difference with this batch macro is the set-up in your main workflow as you'll see. Again, maintain the same steps with the summarise tool and input data. However, so that your control parameter knows what it's grouping by, you need to set up your grouping fields within the macro itself. You also need to set up the question (in the additional tab next to group by) so that it's mapping to your chosen field.
You can choose whichever style of batch macro you'd like to use (alternative or otherwise). They don't occur very often at all in the wild so you likely won't be using them much either way.
Sharing your Macro and Workflow with the world
Now that you've created a fantastic workflow including your macro, you understandably want to share this with the world. However, you can't share the workflow on its own as people don't naturally have access to your self-created macro. To get around this you can create a packaged workflow, like you would in Tableau for example so people have access to your data as well.
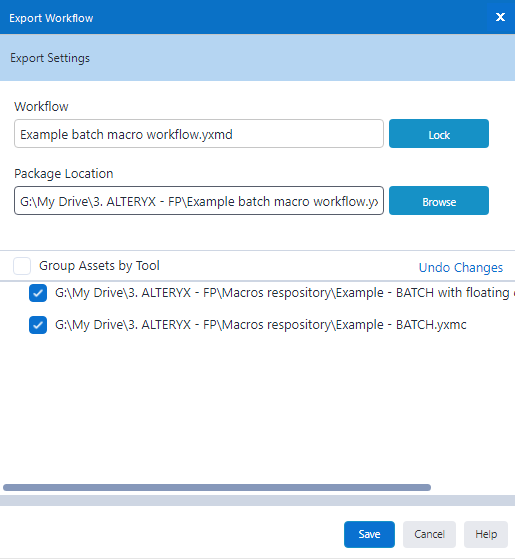
To do this, go to options in your toolbar > Export workflow. You'll get a pop-up window come up like the one below and make sure to tick your associated macros. You might only have one but this is my workflow with both types of batch macro which is why both appear below.
Concluding thoughts
This is an advanced technique in Alteryx (found in the advanced exam, not something tested in core) so don't worry if you're a little lost at the beginning. Even our coaches who are experts in the field say they struggled at the start so it's not a reflection on your abilities at all if you find it a little tricky.
Hopefully this has cleared up most of your questions and taught you lots of new things about macros in Alteryx. Until next time, happy prepping!