


There are many different options and functions on how to optimize working with Alteryx Designer due to the mostly unknown features of the program. Since Alteryx offers so many different features, but not always the optimal usability, some of those are unknown, even by experienced users. Here I will go through three features built into Alteryx and its standard tools that are very helpful but many users do not know about.
Overview:
1. Results Window
2. Select Tool
3. Cache and Run
1. Results Window
The Results Window lets us see the output of a tool, but it has a few additional features that can be leveraged to inspect the data in a different matter.
a) Select the fields to be shown.

By clicking on the “X of Y Fields” you get a select option within the window. This is helpful when you work with many different dimensions, or when you want to compare some to each other.
This is no selection within the workflow, so if you click out of your current view, the results will reset to the default.
b) Cell Viewer
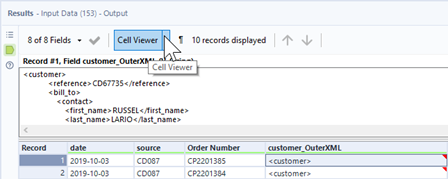
The Cell Viewer lets you see more text in a cell than the normal table can provide. This is helpful when you get the red triangle indicator in the cell that shows that the full text can’t be displayed.
Most people leverage the Cell Viewer by double-clicking on a field, but to disable it again, just click on the button. Don’t try to resize the window, as this will just get annoying with the next cell you want to inspect.
c) Quick Tool insertion
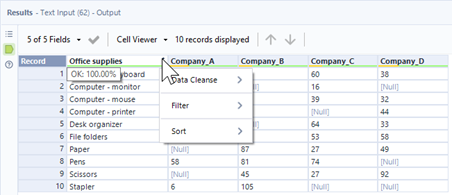
When you click on a header of a dimension, you get the option to leverage three different tools directly from out of the results window. When you click on an option the result is shown in the window, to make this a permanent change in your workflow, you get a green tick you can activate. Once you do this, the step gets integrated into your workflow.
Especially for sorting data, I leverage this option a lot. You can preview how your data will look, and then decide whether to execute the step or not.
2. Select Tool
There are many different ways to use the select tool. Most of the options explained here can be applied to specific fields, by selecting multiple of them with your mouse.
a) Reorder the dimensions
To reorder dimensions in the select tool, you can either use the unhandy up- and down-Buttons, or you can right-click on a field and move it per drag and drop to another position.
This can also be done, by following a specific logic. When clicking on “Options” in the configuration pane, you can select “Sort” and then select how you want to sort your fields.
This is great when you, for example, want to separate strings and numeric values, sorting on field types will achieve this quickly and no manual sorting is needed.


b) Save Tool Configurations

At the options, you also get the possibility to save the configuration of a select tool. When you need the same configurations over different workflows, e.g. you have a standard format that you need to store your data in, then you can save it this way. This will create a .yxft (field type) file that you can store on your computer. This file can then be reloaded in another select tool.
c) Change Pre- and Sufix of the fields.
You don’t need the dynamic select to add a prefix or suffix to your fields, as long as the input doesn’t change, this can be done in the regular select as well. The Options button allows you to access this. The fields will then be automatically put into the Rename Column.

The same logic applies to the removal of prefixes or suffixes.
d) Forget all missing fields
This is an often important option, as missing fields may trigger errors or warnings in the workflow. When you do changes in the workflow, the select tool might remember fields that you already have deleted in previous tools. Make sure to always clear the missing fields when not using them.
3. Cache and Run
The “Cache and Run” option is very powerful when working with large datasets, database connections or APIs. When you select this, Alteryx creates a temporary .yxdb file (you can see the storage location in the results window) and will read this file instead of the original one when you re-run the workflow. This way, the loading time of a file can be decreased enormously.
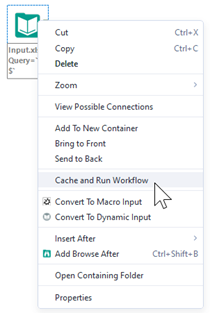
This option should always be used when you work with databases or with APIs, to reduce the amount of data that needs to be requested from somewhere else.
You can select multiple tools at different parts of a workflow and cache them all together. The blue bubble around the tool will then indicate that this tool is read from the local temp file instead of being executed regularly.
One problem with this option is that you cannot see the tool’s configuration anymore, so if you need to check it, you do have to clear the cache to see the configurations again.