


After battling with a few cases of connecting to the Google API, I am going to share on how to do it. For this example, we will connect to the Calendar API.
Step 1: To start, you need to connect to Google Console using your Google account. After you log in, you need to create a new project (this is where your credentials will lie).
Step 2: After you have created the project, now we need to enable the API we want to use (in this case Calendar API). Navigate to APIs and services, and select ‘Enable APIs and Services’:

When you select it, search for the Calendar API and click enable:
After this, come back to the main page of APIs and services.
Step 3: Now you will have to create the credentials. On the left hand side, click Credentials and click ‘Create Credentials’:

And then select ‘OAuth client ID’.

Then you will get a screen that looks like this and now select ‘Configure Consent Screen’

When you click it, you need to select external as that way whenever you run the workflow that is connected to the API, it will bring the consent / log in screen and it will work and then click Create. Then you will get a page that looks like this:

Now just fill in the information that is displayed on the screen. After you’re finished with that, you will get to the page that says add scopes. You can just click continue from here all the way until you get back to the dashboard.
Now, you need to create credentials again as this time we were configuring the consent screen. Click on ‘Create Credentials’ again and select ‘OAuth client ID’. I selected ‘Desktop App’ as to what kind of app this will be. Then select create. This will give you your client ID and client secret. We will use those later.
Step 4: Head to Alteryx. To get a refresh token, that would work all the time and you wouldn’t need to get a new one every time, I have used Google OAuth macro from the Inviso Macros pack, which I got from here: Inviso Macros - Enjoy and suggest! - Alteryx Community
Once you have that downloaded and installed (or just opened in Alteryx), open the macro on a fresh workflow. It should look like this:

Here, what you need to do is insert your own Client ID that you have got from the Google Console and for this example select Calendar API from the list of scopes and then run the workflow.
This will prompt the consent screen to appear and when you click on the email that uses those credentials, you should get something that looks like this:

Make sure you click allow - this then will generate an Authorisation token that you will need to use in Step 2. Now, copy the token and head back to Alteryx. Click on Step 2 of the macro and insert the Client Secret and the generated Authorisation token and click run again.
This now outputs the refresh token that you will need when connecting to the Calendar API, so note it down somewhere.
Step 5: Now delete the macro and get a text input tool. In the text input tool, you need to insert the URL of the calendar API that you want to connect to and what kind of command you want to do. In this example, get a list of events in your calendar. The URL used in this case is: https://www.googleapis.com/calendar/v3/calendars/calendarId/events. The calendar ID in this case is the ID of your calendar which most of the time is your email address or if it is shared, it will be in the settings. Then with the URL, insert the Client ID, Client Secret and the Refresh Token generated in the previous step. You have to make sure that you have access to that calendar as the credentials are linked to your email address.
To generate a new Authorisation token every time you run the workflow I used an OAuth Macro for Google API Authentication - got it from here: OAuth Macro for Google API Authentication - Alteryx Community. When it is downloaded and saved, open it on the same workflow. Make sure that the headers of the fields are client_id, client_secret and refresh_token so that it can automatically be mapped to the correct fields in the macro. This will give you an Authorisation token every time you run the workflow.
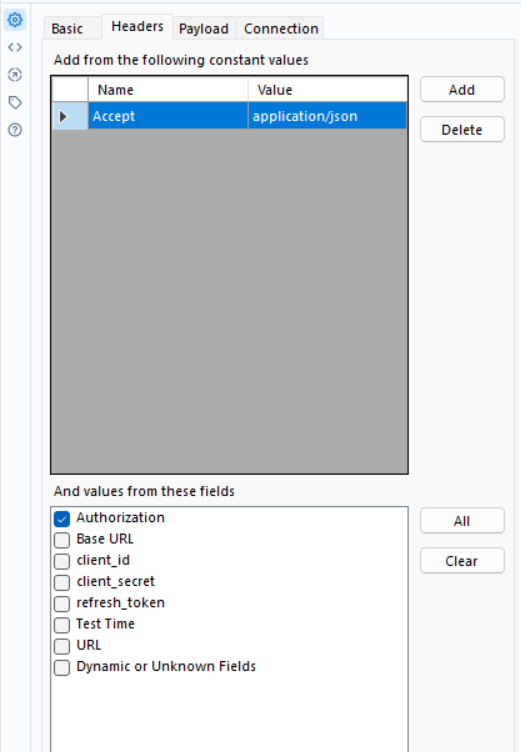
Step 6: Now append the authorisation token to the original input and add the download tool. In the download tool, using the Google documentation, in the headers tab add Name: Accept and value: application/json and click on Authorisation. In the payload tab, just make sure that you have selected GET. This is how the headers should look like:
And voila, it all works!

From here, you can do whatever you want to do with the calendar.
One note to have, when you want to use a different API, you will have to go back and repeat all the steps, just without having to create new credentials. You will have to enable the API you want to do the work on, create the refresh token and connect it to the download tool.
Hope this helps!