


This blog covers part 2 of the process of running a python script in AWS Lambda, saving it to an S3 bucket and pulling data from the bucket to snowflake. This blog covers:
- Setting up correct IAM policies and roles
- Setting up a storage integration
- Setting up a procedure/task to pull data from S3
Before we begin, it is important to note you will need suitable permissions to create S3 bucket as well as IAM policies and roles.
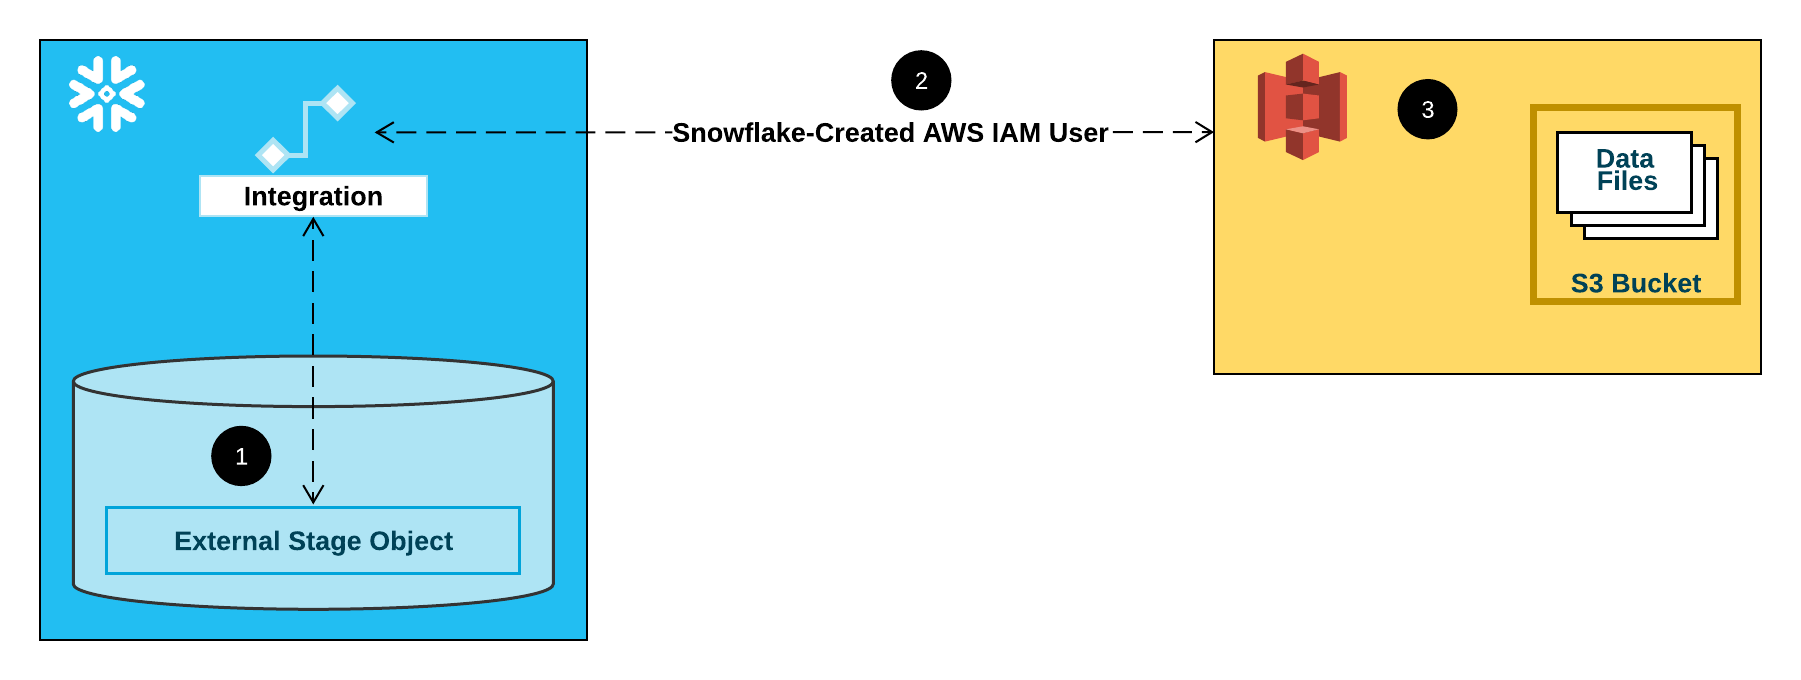
What is Storage Integration?
In Snowflake, Storage Integration is a security and configuration object that allows Snowflake to securely access data stored in external cloud storage services like:
- Amazon S3
- Google Cloud Storage (GCS)
- Microsoft Azure Blob Storage
It is primarily used with external stages, which are Snowflake objects that reference external cloud storage locations. Instead of embedding cloud storage credentials (like access keys) directly in Snowflake objects, a storage integration provides a secure and scalable way to grant Snowflake access. It helps:
- Avoid hardcoding credentials
- Control access with cloud IAM policies
- Enable managed and auditable access
Step 0- Selecting or Creating your Bucket
As this is part 2, I’ve already created an S3 Bucket called harvey-tfl-api, there is a prefix/subfolder called tfl-status then a series of folders for each day the data is being pulled the helps snowflake to quickly look into today’s folder rather than look at all of them.

It is also important to check that the region of your Snowflake account is active in AWS. Go to IAM, then Account Settings to check your active and inactive regions.

Step 1- Creating an IAM Policy
From Account settings, Click Policies and create a new policy.
An IAM policy is a JSON Document that acts like a set of rules that controls who can do what on which resources in a cloud environment. Snowflake Documentation has a premade JSON Script where you only need to add your bucket name and remove the <prefix>/ (if necessary):

Name then save the policy.
Step 2- Creating an IAM Role
From Policies, Click Roles and create a new Role.
Roles use policies to define what actions they’re allowed to perform.
Basic Structure:
- Role = Who or what is acting (e.g. Snowflake, EC2, a user)
- Policy = What that role can do (read, write, delete)
- Trust Policy = Who is allowed to assume the role
On the next page, the trusted entity type we want is AWS Account.
The next step we have to do is create some placeholder values that get updated later.
On An AWS account, we want to click Another AWS Account.
Make a dummy 12 digit account ID (can also just copy and paste your number for This account) and a dummy External ID.

Click next then find the policy permission you just created. Finally name and save your role.
Step 3- Creating Storage Integration in Snowflake
First, click into your created role and copy the ARN, this is your <iam_role>
Go into Snowflake, set up the area you want to create the storage integration in (e.g.database, schema etc) and copy and paste this script:
CREATE STORAGE INTEGRATION <integration_name>
TYPE = EXTERNAL_STAGE
STORAGE_PROVIDER = 'S3'
ENABLED = TRUE
STORAGE_AWS_ROLE_ARN = '<iam_role>'
STORAGE_ALLOWED_LOCATIONS = ('s3://<bucket>/<path>/')
[ STORAGE_BLOCKED_LOCATIONS = ('s3://<bucket>/<path>/') ] – Optional
Fill in details and give it a sensible name (e.g aws_to_s3_integration) and it should run.
Step 4- Filling in the blanks
Remember those dummy Account ID and External ID we created? We can now fill those in.
To retrieve the IDs that were created automatically for your Snowflake account, run this command on your new storage integration:
desc INTEGRATION aws_to_s3_integration;
Now copy the two values that were created

Go back to the role you created on AWS and go to Trusted Relationships. Then edit policy.
You will see the JSON for the Role we created with the dummy IDs, remove the green text between “ “ on lines 7 and 12 and paste the property_value for the storage_aws_iam_user_arn and storage_aws_external_id respectively. Then update policy.

Step 5- Creating an external stage
We need to create an external stage to check that our data is coming through. First I created a file format so Snowflake knows JSON data is coming from AWS:
create or replace file format my_json_format
type = 'JSON'
compression = 'AUTO'
enable_octal = FALSE
allow_duplicate = FALSE
strip_outer_array = TRUE
strip_null_values = FALSE
ignore_utf8_errors = FALSE;
Next, we create the actual stage point to our subfolder and using our storage integration and file format:
create stage aws_json_stage_tfl
url = 's3://harvey-tfl-api/tfl-status/'
STORAGE_INTEGRATION = aws_Harvey_tfl_s3
DIRECTORY = ( ENABLE = TRUE )
file_format = my_json_format;
We can run this command on the stage to check if the data is coming through:
list @aws_json_stage_tfl;

Next we need to create a blank table for the data to go into. The table will only have one column (raw_json) and its data type is variant:
create or replace table raw_tfl_json_table (
raw_json variant
);
Step 6- Creating a procedure and task
Finally, we need to write a COPY INTO statement to get the data from the stage to the table. However new files are being added every hour. If we want the data to be added automatically we need to do some extra steps
I want my COPY INTO statement to only look at today’s folder rather than all of them (e.g 2024-07-05, -06, -07 etc). We can’t exactly use current_date() in the COPY INTO statement so we’ve got to create some variable strings to rebuild the COPY INTO statement every time it runs:
CREATE OR REPLACE PROCEDURE load_json_hourly_proc()
RETURNS STRING
LANGUAGE SQL
AS
$$
DECLARE
v_date STRING;
v_path STRING;
BEGIN
-- Format the current date as YYYY-MM-DD or similar
v_date := TO_CHAR(CURRENT_DATE(), 'YYYY-MM-DD');
-- Build the path with the date as subfolder
v_path := '@TIL_PORTFOLIO_PROJECTS.HARVEY_PERSONAL_PROJECT.AWS_JSON_STAGE_TFL/' || v_date || '/';
– Run the COPY INTO statement
EXECUTE IMMEDIATE '
COPY INTO raw_tfl_json_table
FROM ' || v_path || '
FILE_FORMAT = my_json_format';
RETURN 'COPY completed for path: ' || v_path;
END;
$$;
So we have the procedure to create the COPY INTO statement, we can now create a task to run the procedure every time AWS creates a new file.
The EventBridge in AWS triggers every hour (e.g 9:00, 10:00, 11:00) so I scheduled the task to run two minutes after every hour (e.g 9:02, 10:02, 11:02) to make sure everything ran smoothly.
-- running task
CREATE OR REPLACE TASK load_json_hourly
WAREHOUSE = dataschool_wh
SCHEDULE = 'USING CRON 2 * * * * UTC'
AS CALL load_json_hourly_proc();
After creating the task, we just need to run it! I only ran it a few times to test it works as it can get expensive on the Snowflake end:
ALTER TASK load_json_hourly RESUME;
And that's it! From part 1 to part 2 we have created a completely automated process that:
- Runs a python script that pulls data from the TfL API every hour
- Moves the data to an S3 bucket
- Snowflake picks up new JSON files and puts them in a table
- Tableau visualises the TfL data
