


Stakeholders can have varying levels of technical understanding and there may be times where they have to interact with a Alteryx flow that you've created. Say they need to upload a file, change a filter or even input some text. Alteryx can be fairly daunting for someone who's never used it before. To get around this, you can create an App.
What is an App?
- An Alteryx app is simply a workflow with a nice interface that makes using the Alteryx workflow much easier for people that aren’t quite familiar with the Alteryx interface
- Making an app requires you to build a workflow that can be altered somehow by the user.
- You can control what the user changes using Alteryx’s interface tools. This includes tools like a checkbox, a date selector, file input tool, drop down, etc…
Best Approach for Building Apps?
- Trying to think of what interface tools to use to answer a particular question can be difficult to do at the start, so a good idea is to build the workflow first
An important aspect of building an app or macro is ensuring your workflow works without the interface tools connected.
- This simple step helps you to understand where your interface tools need to be connected to and what are the things that need to be changed by the user to make the app work.
Example - Alteryx Challenge #215
- To help you understand, let’s build an app to let you filter Pokémon by what region they come from and what type they are.
- The challenge is to:
“Configure the App's interface tools to use a List Box for the Regions, a Dropdown tool for the type, a Check Box tool that allows legendary Pokémon, and a Check Box tool that removes regional variants of the same Pokémon.”
- To keep things simple, let’s just look at the first part of the challenge and ignore the check boxes.
- Looking at the data, it’s simply a list of Pokémon with their related regions, types with info on whether they are a legendary or a regional variant.
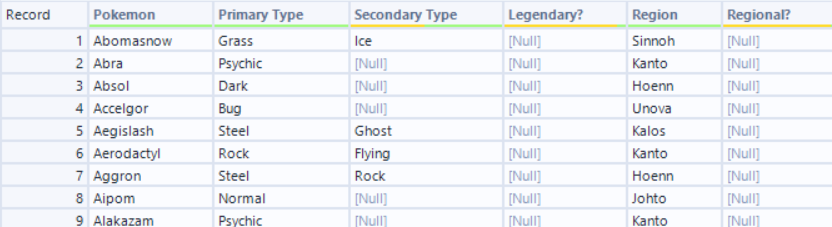
- If we think about what each of these interface tools are doing, the list box is essentially a region filter, the dropdown tool is a type filter
- With this in mind, let’s begin to build our flow.
Region Filter
- Now that the data’s in the correct format, let’s add a filter for the region.
- Instead of just doing a basic [Region] = “Sinnoh”, we must use an ‘IN’ function as we’ll be filtering with a list box. We want the field we are filtering by to be part of a list.
- So our formula for the filter we something like ‘ [Region] IN “Sinnoh” ‘
The region you select will not matter as your list box will allow the user to change this
Type Filter
- The Type filter is a lot more simply
- It will simply be a basic ’ [Type] = “Fire” ‘ filter.
Again the type you choose here will not matter as your dropdown will allow the user to change this
Check your flow works
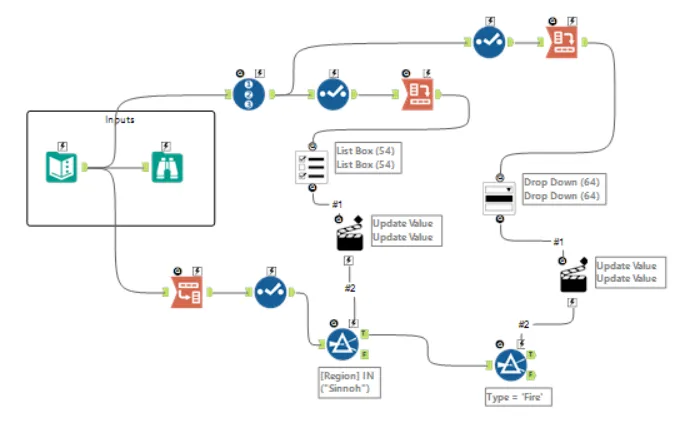
- At this point, your flow should look something like this
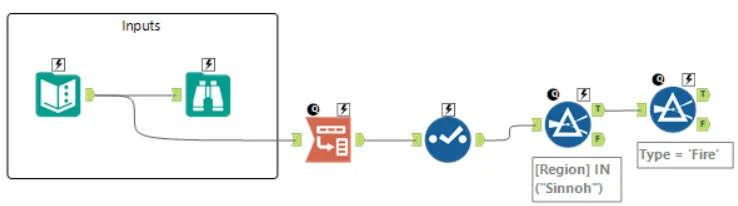
- We can now run this part of the flow to check it works and once we do that, we get a table with only your filtered Pokémon

- Now the question at this point is, how do we allow the user to change these filters.
- We can now look to attach our interface tools to these filters!
- As we want to allow the user to select multiple regions, we need is the list box tool.
List Box Tool
- To use the list box tool, we need to input the data to list
- We can simply use a text input and list the types in the dataset, this would work fine
- However, this is not future proof as what happens when Pokémon add a new region
- To future proof this, we can get the regional data from the input.
- The list box tool allows you to select column names, however, our regions are all within one region column.
- To get them into the correct format, we must crosstab the region column
- It doesn’t matter too much what the values for your new columns are, in this example I’ve added a record ID column and used that as the values
- To get them into the correct format, we must crosstab the region column

- Once we crosstab, we can now input this separate part of the flow into our list box tool.
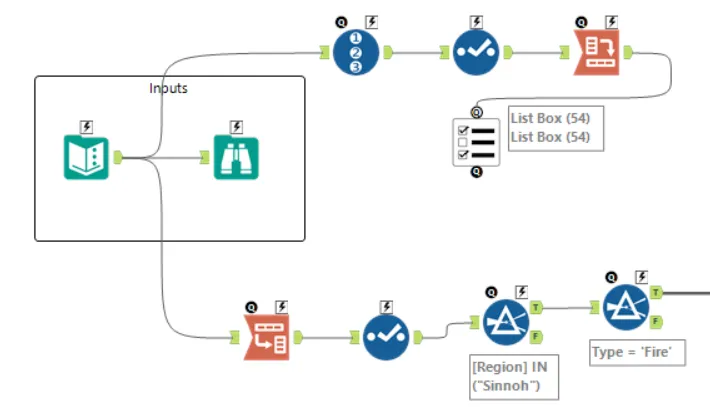
- Before we connect this tool to our flow, let’s add the type selection interface tool. We only want to allow the user to select one type at a time, so we can use a dropdown tool
Dropdown tool
- Similarly with the list box tool, the dropdown tool will allow you to select column names
- The types have the same issue as our regions, in that are all within one type column
- This means we have to repeat our crosstab, just as we did with the region column.

- Once we have done this transpose, we can connect this separate part of the flow to our dropdown tool
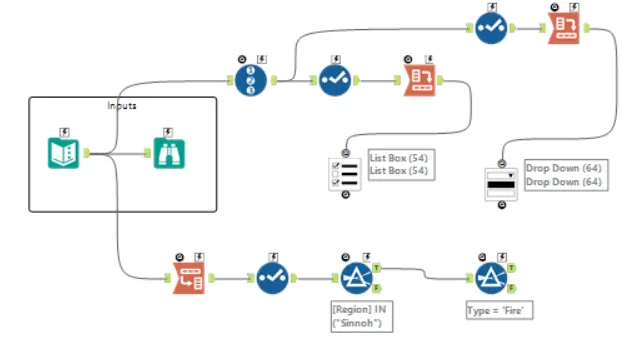
Connecting the Interface tools
- we can do this by connecting the interface tool with the lightning symbol on our filter
- When we do this, an action tool will appear
- This action tool essentially allows you to configure how the interface tool interacts with the tool it’s connected to.
- In this case, we want to allow the interface tool to populate part of the formula in the filter tool.
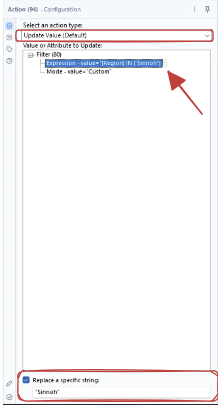
- Click on the action tool to bring up the configuration pane
- We want to update a value (default setting)
- The value we want to update is part of the expression in our filter
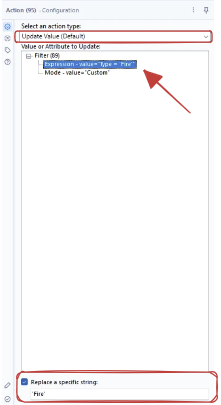
- As we only want to update a specific string in the expression, we must select the ‘Replace a specific string’ option, and type the region that you have typed in your filter (including the speech marks)
Now our interface tools are in the flow but to allow them to affect out filters, we need to connect them
- We can do the same for our dropdown tool
Checking it works
- Now that we’ve configured our interface tools and connected them to our flow, we should be ready to check our app!
- First add a browse tool to the end of your flow and run
- To actually check the the app, you must run it as an analytics app with this icon

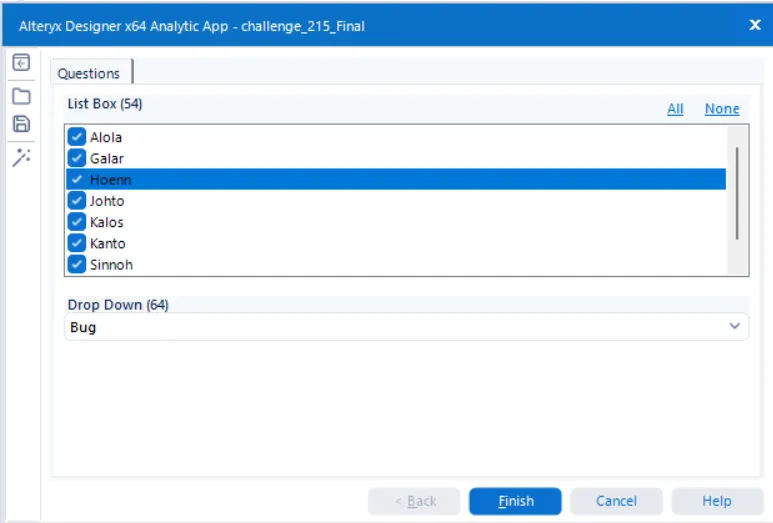
And that’s it, you’ve built your first app!
I hope this blog has been an enjoyable walkthrough and given you a clearer idea of what’s possible with apps.