


This is a quick guide to your first git repo. After installing git (and optionally GitHub desktop), you can follow these steps to learn the basics of version control.
Step 0: [Optional] Open the terminal and create a directory
When downloaded, git comes with a lightweight bash terminal called git bash, using this is a great way to familiarise yourself with simple bash commands. You can create a new directory to track with git using this command.
mkdir git-demo
Step 1: Initialise the Repo/Create a new repository in GitHub desktop
The simplest way to get Git to track changes in your repo is to run the following command in the directory of your project:
git initYou should get a message like this:

If you'd rather use the GitHub desktop application, you can also create a new repository by using File -> New repository...
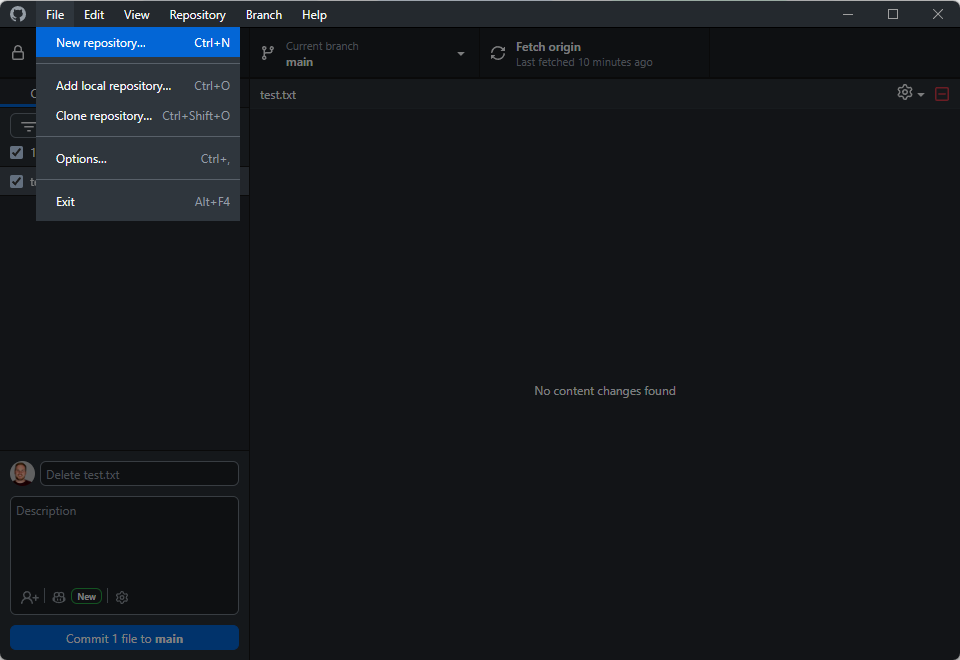
When you initalise a Git repo, Git creates a hidden folder called .git. From now on, Git will be able to track changes made in the repo.
Step 2: Check your changes have been tracked using Git status.
After initialising Git, make a change to any file in the repo or create a simple file in bash using the code below:
echo Hello World > file.txt
You can then check changes in the repo using Git status:
git status
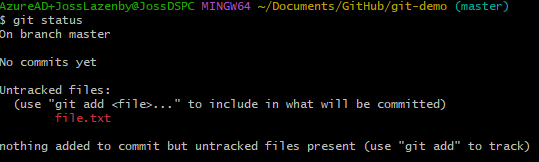
This will display changes that have been made in the repo. New files will show red under "Untracked files" meaning that Git can see the file exists but isn't tracking changes yet.
Step 3: Stage changes using Git add
Before you save any changes to your code, you have to clarify which changes you want to include. This is "staging" your code before it is committed to the record.
# to stage a specific file
git add file.txt

# to stage all changes in the folder
git add .
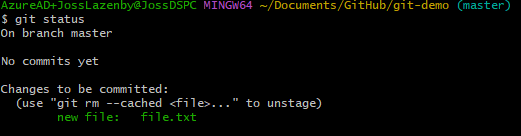
If you run git status again here, the code should display green - showing it is ready.
Step 4: Commit the changes using Git commit
When you've checked over your staged changes using git status, you can commit them to the git history using commit command.
git commit -m "my first git commit"
It's important that you give your commits clear and informative names. This helps yourself and any collaborators on the code understand the intention of the changes you've made.
Now we have our first tracked change! You don't need to commit changes after every edit to a file, but each commit you make allows you to go back to that point in the history later on.
Bonus: creating a new branch
Git is a collaborative tool at its core, and typically developers working on the same project will create branches to keep their work distinct from the main production code. To create a new branch, you can use two different commands: checkout and switch.
Git checkout vs. Git switch
Historically, git checkout was the go-to command to create and jump between branches. However, because it handles a lot of other tasks too, Git recently introduced git switch as a simpler, more dedicated alternative.
To create and move to a new branch, you can use either of these commands:
# The traditional way (-b stands for branch)
git checkout -b branch-name

# The modern, clearer way (-c stands for create)
git switch -c branch-name
Whichever you choose, Git will spin up an independent copy of your code. You can make edits, break things, and experiment here without worrying about messing up your main branch.
In review: version control with git
This is all you need to start experimenting with git for your own local projects!
As a quick cheat sheet, here is the cycle you'll find yourself repeating as you build:
- Write some code (make your edits or add new files).
git status(see what Git is noticing, run this whenever you're going to stage or commit code).git add .(stage your work to prepare it for saving).git commit -m "explain what you did"(lock it into your project's history).
The next major milestone is connecting your local repository to a remote server like GitHub so you can share your work with the world or collaborate with a team. But for now, celebrate the fact that your code is officially tracked and safe.