


In the previous blog, I shared the "Equal Sum" method in the Tile Tool in Alteryx. With the "Equal Sum" method, you can split the category into equal tiles. However, you cannot split the number of each category to equal values for tiles.
Imagine that you have multiple pizza boxes (each pizza box includes many sizes: 8", 10", 12") and you want to divide those pizza to all the people in a room. However, you cannot open the pizza box to count how many slices are in each box, and the size is also different. It's hard to share pizza slices with everyone. You can count how many pizza boxes there are and split them equally between each half of the group in the room. Note that the size of the pizza box is not one size. So you will see group 1 might have more/less boxes than group 2.
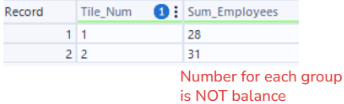
That's an example of how the equal sum method works. You can check my blog here. From Fig. 1, you can see that with the Equal Sum method in the Tile tool, it splits into 2 tiles. But the number of employees is not balanced, as we cannot move employees from one group to another. Same as the example above, cannot open the pizza box from group 1 and share some slices with the other group.
In that case, we can consider using another method called Equal Records, which I will share in this blog. Let's figure out how the Equal Records works in the Tile Tool, and how each option works. I use the same example in the previous blog; the Text Input tool looks like this:
Let's get started!
Equal Records
According to the Alteryx documentation page, the Equal Records method helps to divide the records into the specified number of tiles, so each tile will be assigned the same number of records.
Same as the Equal Sum method in the previous blog, there are many options to choose from in the Configuration window. Each option could lead to different results. Depending on the problem, you can consider which option needs to be applied.
Divide into 2 tiles - No options
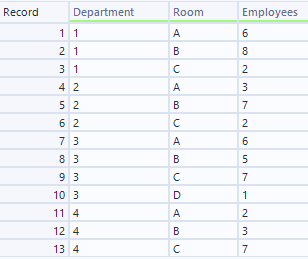
This is a simple use case. For example, a company with departments, rooms, and some employees for each department and room. I want to split that table into 2 equal groups.
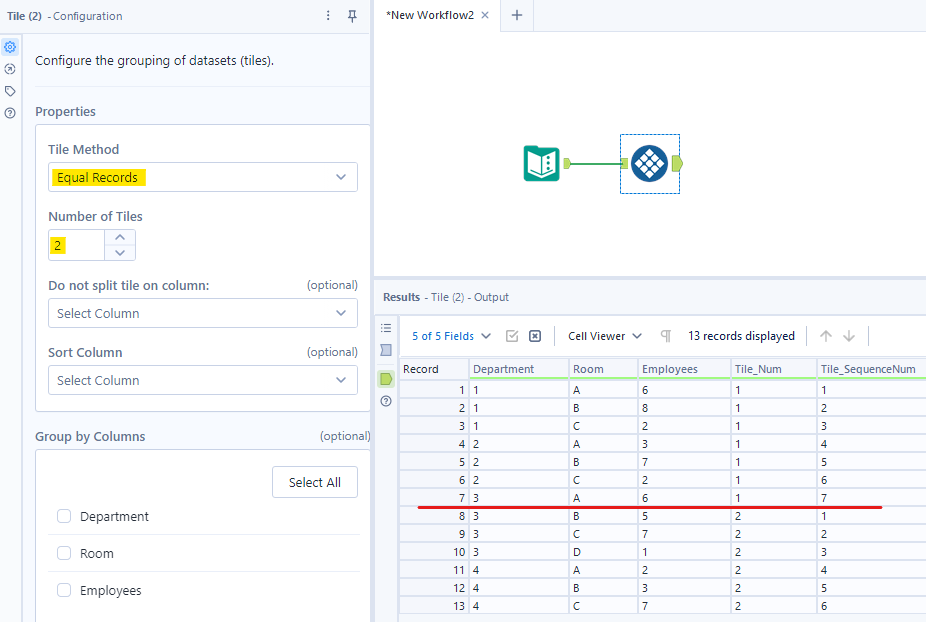
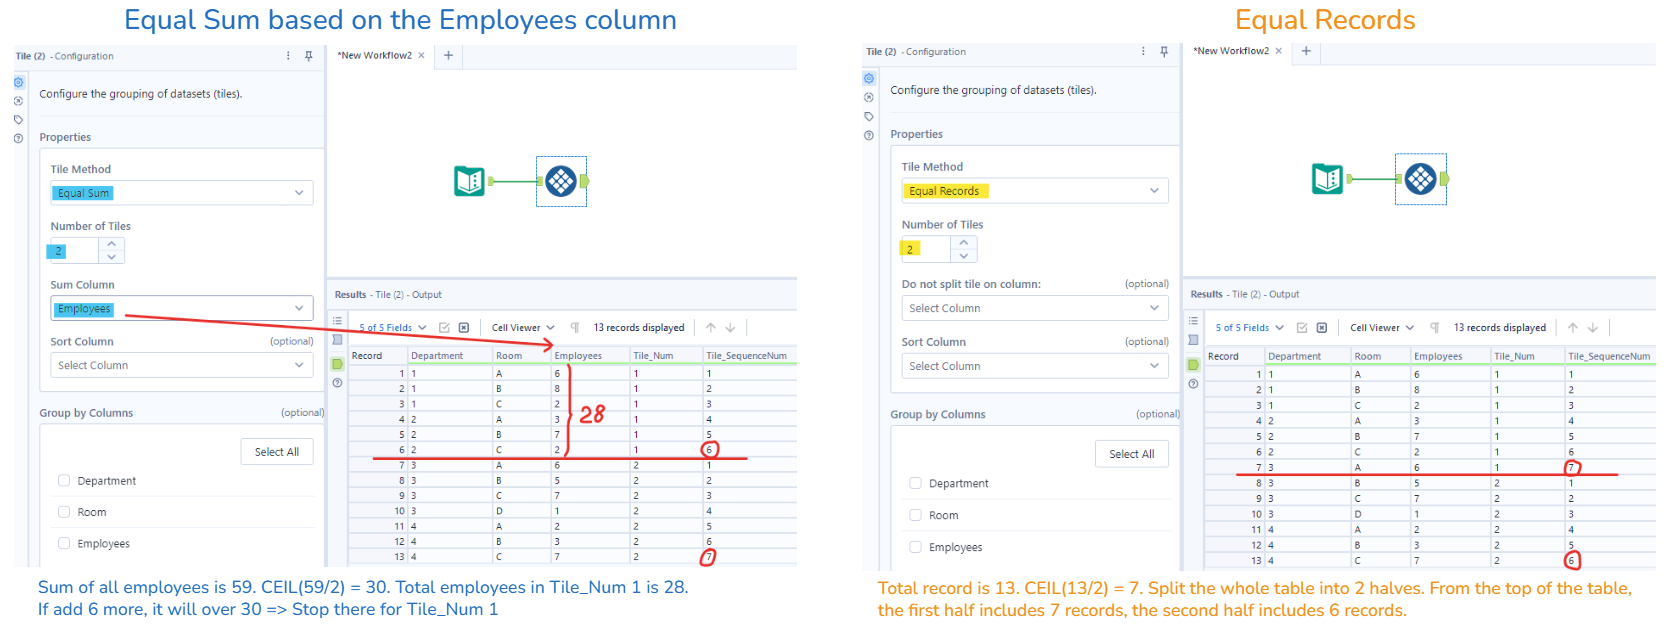
Here, you see in the Configuration window that I only set the Tile Method and Number of Tiles. So it only split the table into 2 half of records. The total record is 13. The first half includes 7 items (use the CEIL), and the second half includes 6. It didn't depend on any columns like the "Equal Sum" method.
In contrast, the "Equal Sum" method cares about the sum of the total employees in the table (the Sum Column option is required). Then, split them into 2 (specified number of tiles). If the total values in the Sum Column are greater than half of the total sum column, then it will stop and cannot add to the current tile anymore.
Divide into 2 tiles - Do not Split Tile
In the Configuration window, if you choose a column in Do not split tile on column (for example, I choose Department), the result looks like this:
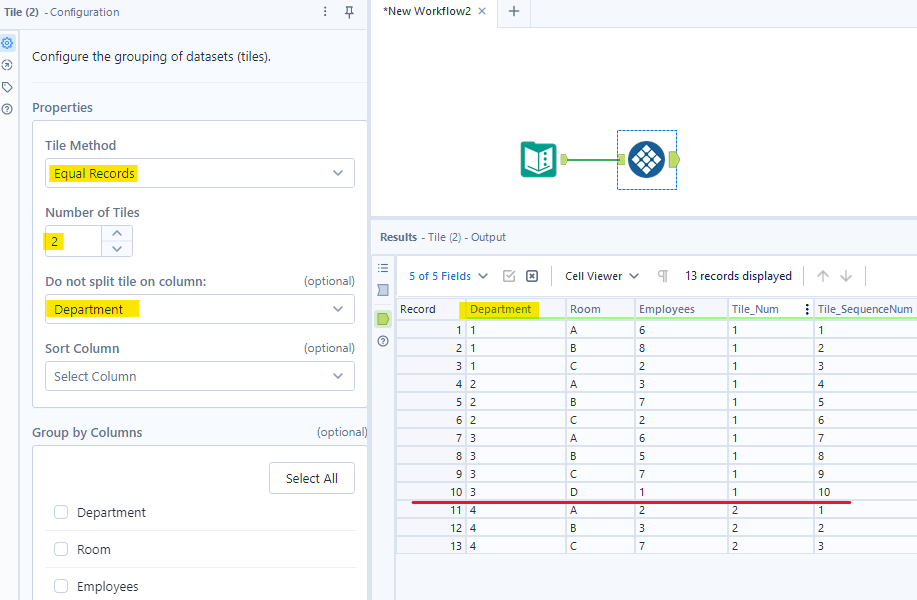
So the Tile_Num 1 includes 10 records, and the Tile_Num 2 includes only 3 records. It definitely is not equal. But why does it show that result? Let's figure it out!
"Do not split tile on column" means values in that column must be grouped in the same tile. Note that the same value must stand next to each other to be grouped in the same tile.
Keep in mind that the total record of the table is 13, the first half will be 7, and the second half will be 6. Note that Department is sorted in ascending order, so each department is next to the other.
Tracking:
- On the first run, it will check Department 1 (as we set the Department column in Do not split tile on column), 3 records of Department (rows are in sequential) are still good <= 7
=> Tile_Num = 1, Tile_Sequence starts from 1 for Tile_Num 1 - On the second run, 3 records in Department 2 + 3 records in Department 1 = 6 <= 7 (all good! keep the Tile_Num, but still need 1 more record)
=> Tile_Num = 1, Tile_Sequence continue counting - On the third run, from the previous run, still need 1 more to reach 7. However, another condition is cannot split the Department column. So, it adds 4 records (from Dept 3) + 6 records (from Dept 1, 2) = 10 > 7. Now, it has enough and overflow, stop Tile_Num 1 there.
=> Tile_Num =1, Tile_Sequence continue counting, but stop Tile_Num 1 here - Continue with Dept 4, now the rest is Tile_Num 2
However, if I choose the Room for Do not split tile on column, the result is the same as the previous part.
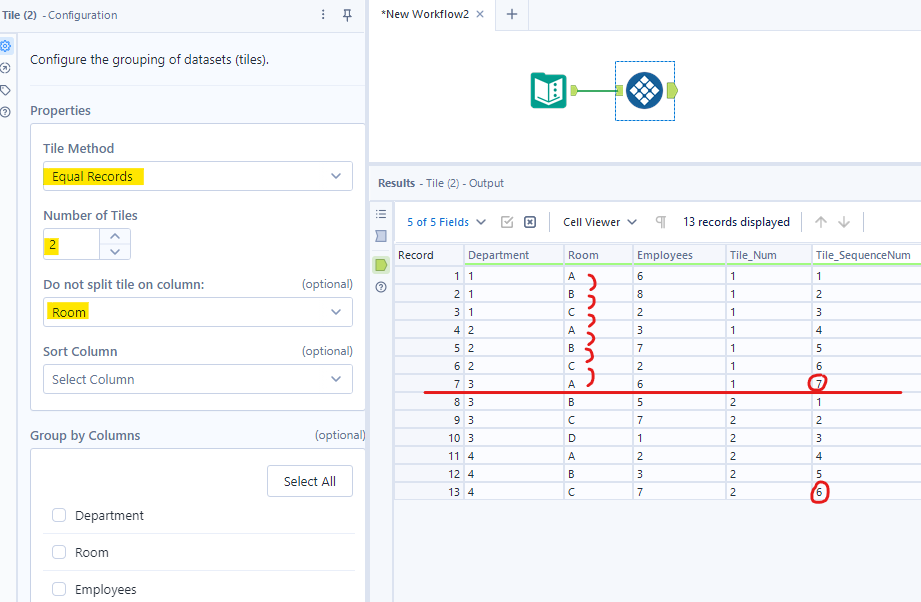
As you noted, in the previous example, I choose Department column for Do not split tile on column. That column was already sorted in ascending. It will check the current row with the previous row in the Department column to group by, and cannot be split.
Now, in the case that I choose Room, the Room column hasn't sorted yet. Therefore, each value for each row in the Room column is recognized as a single record. The Tile Tool will count until it reaches 7 records for Tile_Num 1.
To solve that problem, we have another option to "Sort Column" below.
Divide into 2 tiles - Do not split Tile and set Sorting
Continue from the previous problem. Now, I choose the Room column in the Sort Column option.
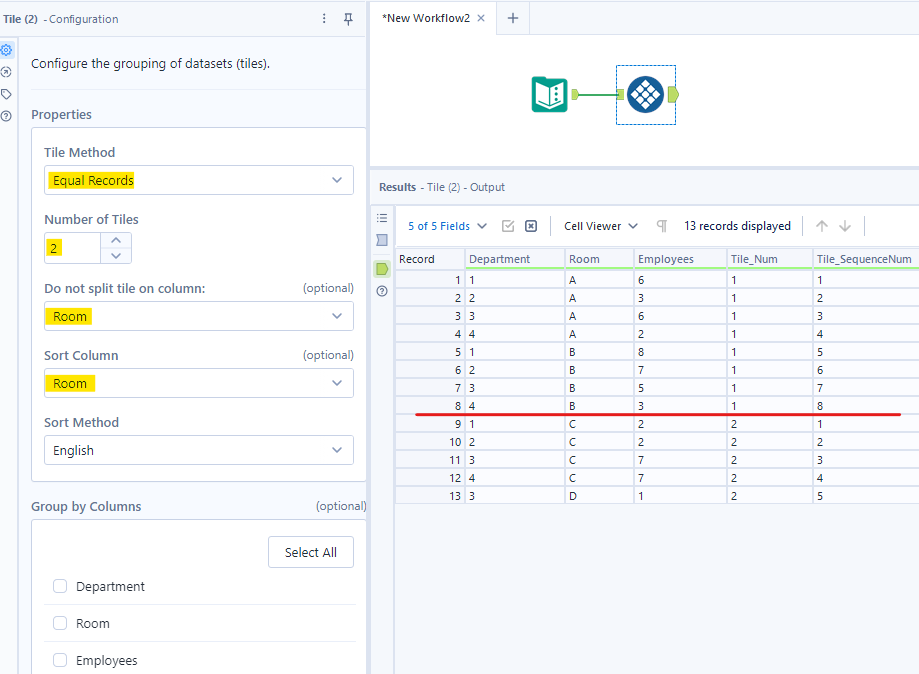
After I add the option to sort the Room column, you see that the Room column is sorted (A, B, C, D). Now, all the same room values are standing next to each other. We also set "Do not split tile on column" in the Room. So, it will do the same as I did tracking in the previous part.
- Room A includes 4 records <= 7 (need 3 more records)
=> Tile_Num = 1, Tile_SequenceNum starts from 1 - Room B includes 4 records + 4 records (from Room A) > 7 (enough, stop Tile_Num 1 here)
=> Tile_Num = 1, Tile_SequenceNum continues - The rest is Tile_Num 2
Divide into 2 tiles - Group by a column
Now, let's explore how the Group by Columns option works in the Tile tool with the Equal Records method.
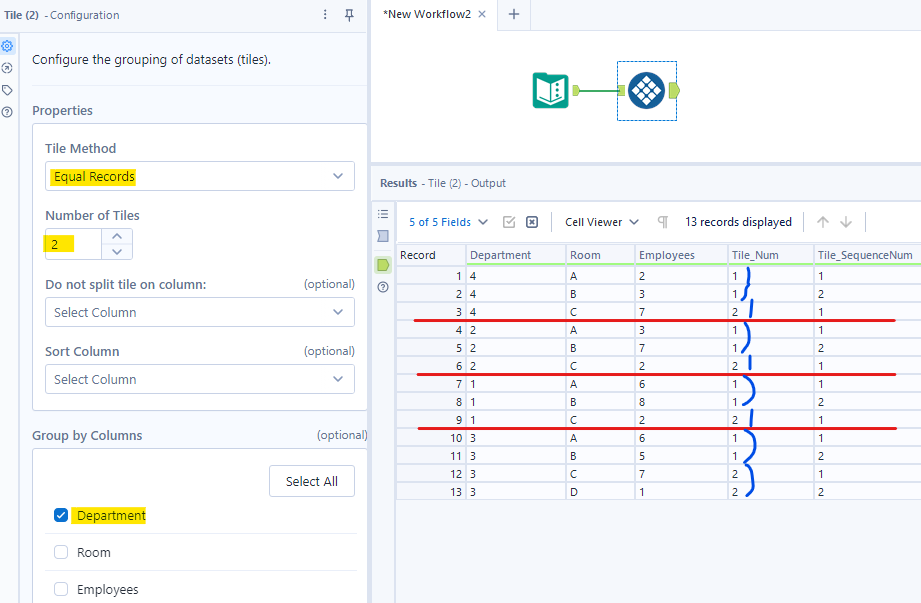
For example, I only chose the Group by Department column for the Equal Records. You can see in the result window. For each department, it will be split into 2 equal tiles. For Departments 4, 2 and 1, there are 2 records for Tile_Num 1, as it uses CEIL (3/2) = 2. For Department 3, there are 4 records, so 2 records for each tile.
A big difference between "Equal Sum" and "Equal Records" is that you can split the records into individual records for each row. In "Equal Sum", when you split the record (for example, the employees column), the total sum is preserved. With "Equal Records", it will count the number of records, so it's more convenient to split the records into groups.
Now, I will split the number of employees into individual employees for each row by using the Generate Rows tool.
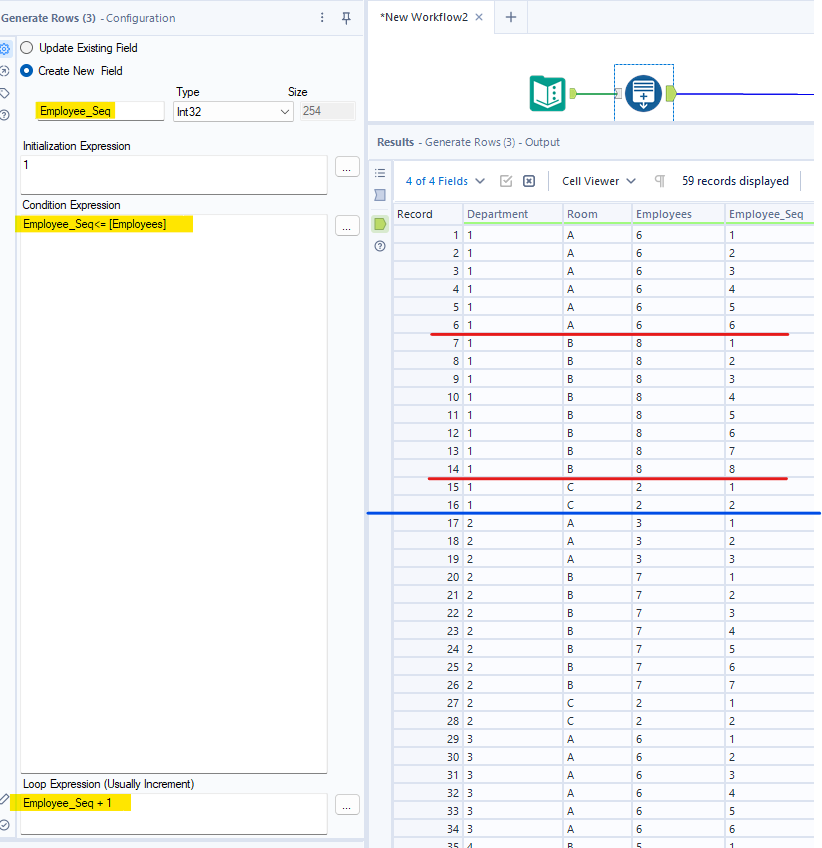
From Fig. 9, you can see that in Department 1, Room A, there are 6 individual employees (represented by each row), 8 individual employees in Dept 1, Room B, and 2 individual employees in Dept 1, Room C. The total records for Dept 1 are 16.
Now, giving the problem:
I want to split each department into 2 equal tiles (tile_num 1 and tile_num 2), and employees from the same Room must be in the same Tile. If the number of employees from the same room and the same department is overfilled in the same tile, those employees can join another tile.
- First condition is #records in Tile_Num 1 = #records in Tile_Num 2. If the total of records in a department is an odd number, then Tile_Num 1 is CEIL(total_records/2) and the rest is Tile_Num 2.
- The second condition is that employees from the same Room must be in the same tile.
Let's set it up in the Tile tool!
From the problem above, for each department, I need to group by Department. The second condition is that all employees must be in the same room for the same tile, so I need to set Do not split tile on the Room column. As we want 2 tiles for each group, I set the number of tiles to 2.
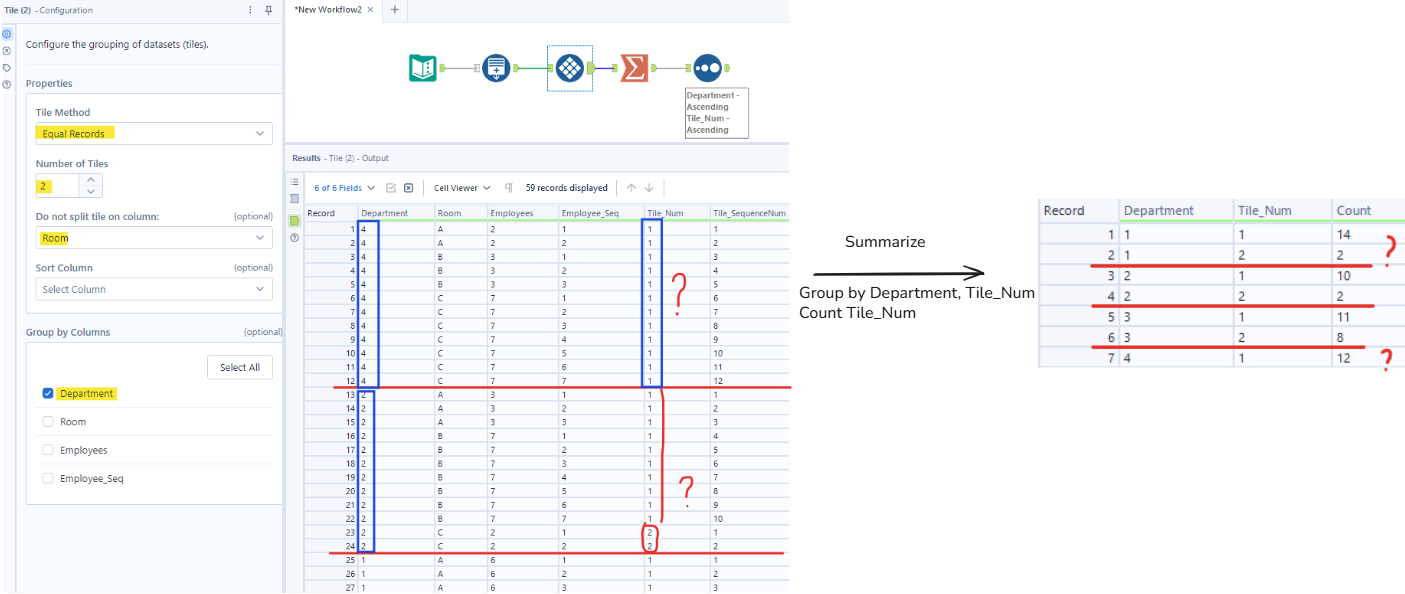
I configured the Tile Tool as I described above, but the result didn't show as I expected. As you can see from the result table on the right (Fig. 10), the number of records in Department 1 for each Tile is not the same, although the total record in Department 1 is an even number (16).
Why does it show that way? Let's figure it out! :)
Let's take a look at Department 4 first. It only outputs 1 Tile_Num, although the total record is an even number (12) with different Rooms there. If I follow the logic that I explained above, for each department, get the total records. For Department 4, the total record is 12, so the first half tile must equal the second half tile (6). The second condition is same room must be in the same tile.
Let's track how it runs in Department 4:
- First run, all the same rooms are standing next to each other. Room A has 2 records <= 6 (still need 4 more records)
=> Tile_Num = 1, Tile_SequenceNum starts from 1 - Second run, check Room B has 3 records + 2 records (from Room A) = 5 <= 6 (still need 1 more record)
=> Tile_Num = 1, Tile_SequenceNum continue counting - Third run, check Room C has 7 records + 5 = 12 > 6 (as we need 1 more record, now it satisfies, but we cannot split the Room column, need to add the whole Room C for the same tile)
=> Tile_Num = 1, Tile_SequenceNum continue counting. - Continue to check if any records haven't been added to Tile_Num (no more)=> stop
So the second condition is the reason why it only shows Tile_Num 1. What if I don't set the "Do not Split tile on Column"? Does it solve that problem?
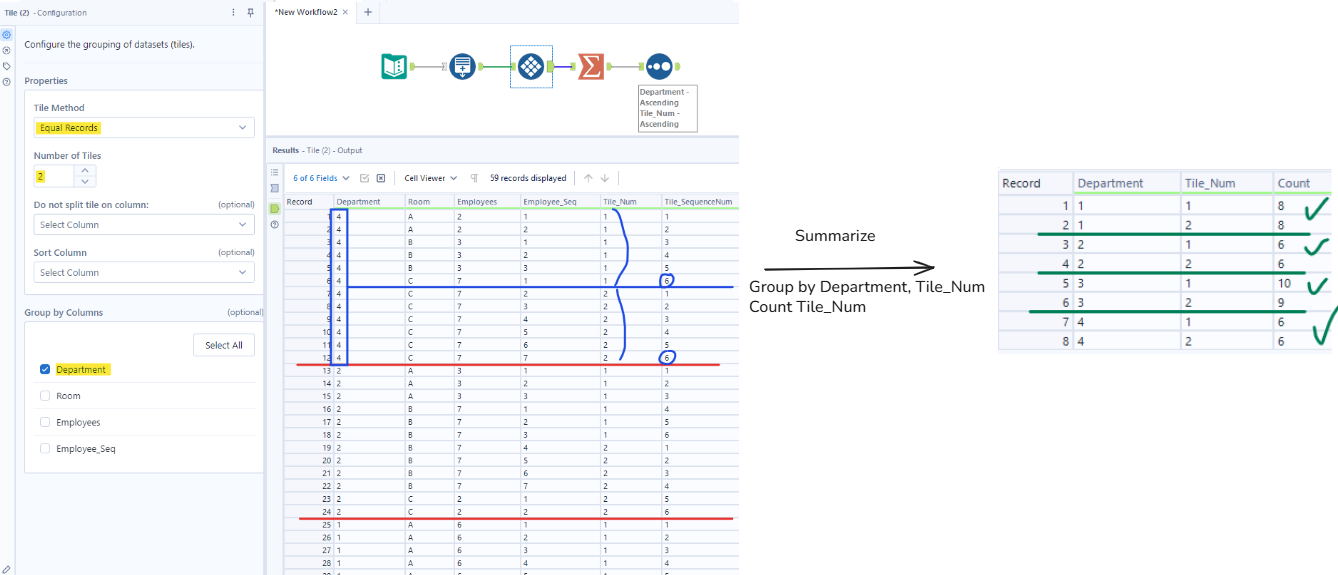
If you look at the result table on the right, it successfully split each department into 2 equal tiles. Looks good!!! In our case, the Room column was already sorted in an English way from the beginning, so the same room is standing next to each other. It could be wrong in another case if the Room is messed up.
Is there any alternative way or the optimal solution? Did you recognize that we still have one option that we haven't tried? ;) Let's try it!
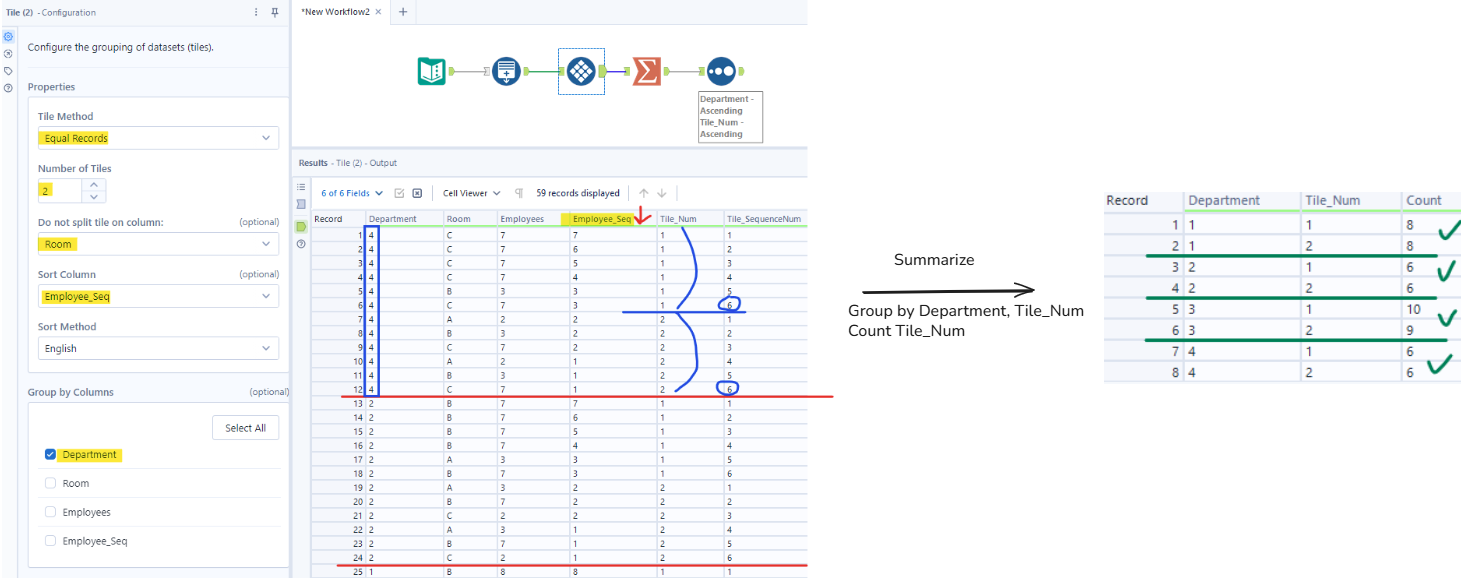
Now, configure the settings in the Configuration window like Fig. 12 above. The second condition is that employees from the same room and the same department must be in the same tile. If there's overflow in a tile, those employees can join another tile. You see that the Employee_Seq column is sorted in descending order for each Department. It will ensure that most employees are in the same room and the same department must be in the same tiles before checking other Rooms and Departments.
The question is: How do I know which column to choose for Sort Column, as we have Department, Room, Employees, and Employee_Seq?
Answer:
- We already grouped by the Department column, so sorting by the Department column is useless, as it sorts only 1 value.
- As we set Do not split tile on the Room column, if you choose Sort by the Room column, it cannot split the number of employees from one room to another room => the result of each tile is not balanced. It can also show only 1 tile (same as Fig. 10).
- Choosing the Employees column to sort is the same as the Room column because that's the total employees for each Room.
- Only the remaining column is Employee_Seq for sorting. This column shows the unique value for each row. For each Department, each room, the individual employee is marked by a number.
=> One tip to choose the column to sort: The column contains a unique row value.
For this setting, if the input table hasn't been sorted or the data value of each row was messed up, it still returns correct output as we expected.
In this blog, I shared the definition of the "Equal Records" method, how this method works for each setting, and its outputs. I also shared some results that could happen for some use cases, and how to set the Tile tool to show the output we want.
As I discussed the difference between the "Equal Sum" method and the "Equal Records" method at the beginning, the "Equal Records" method is more convenient for splitting the records into tiles equally. Depending on the problem that you are working on, you are flexible in choosing a method to solve the problem.
There are 3 more methods (Smart Tile, Unique Value, and Manual) in the Tile tool. I will see you in another blog!