


Whether you're working on a side project, contributing to open source, or collaborating with a team, version control is your best friend and Git is the gold standard. But knowing how to use Git locally is only half the equation. Publishing your repo is where the real magic happens. It's your signal to the world (or just your teammates) that your work is alive, versioned, and open for collaboration.
Why Publish?
Publishing your Git repository to GitHub means you're no longer coding in a vacuum. It:
- Backs up your work
- Makes collaboration easy
- Enables issue tracking, code reviews, and CI/CD integration
- Creates a portfolio of your work
So how do you go from a local folder on your machine to a live, shared repository?
Step-by-Step: Fork to Pull and Integration
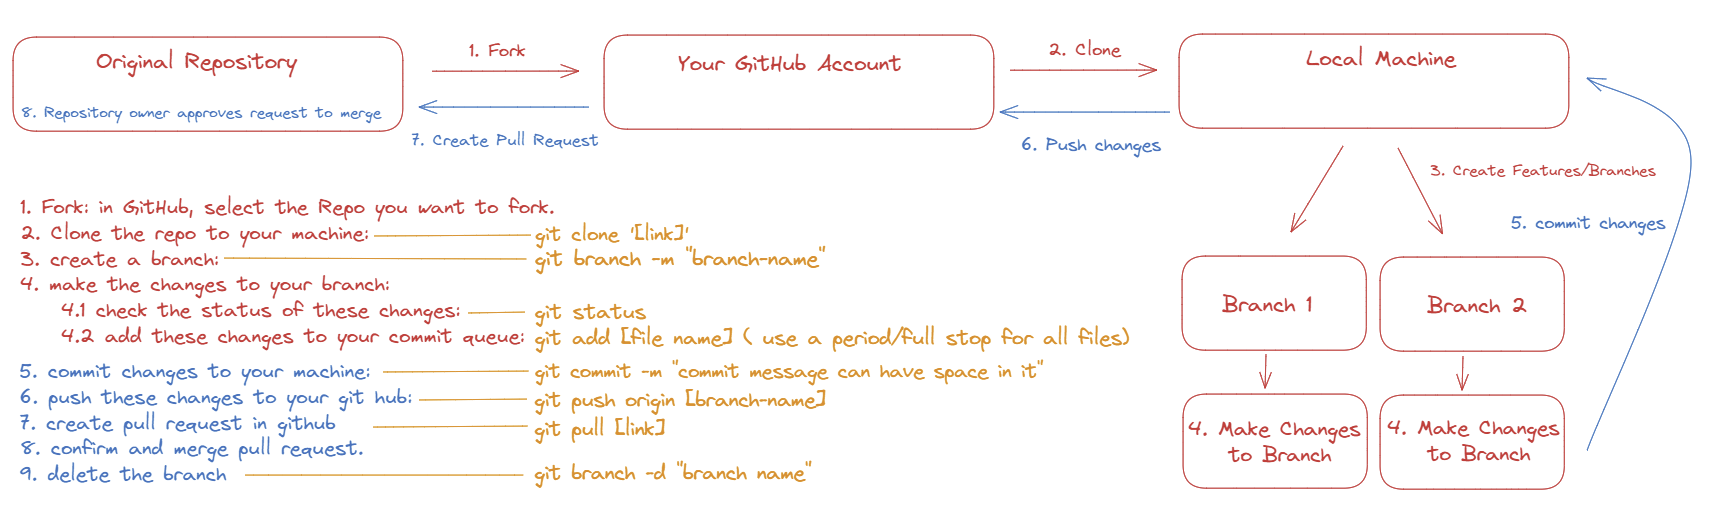
If you are working off of an existing repository that may sit in a colleagues or organizations folder, you're going to want to start off by forking that repo into your profile:
1. Fork or Create the Repository
Head to the repository of choice, fork the repository, and select "create fork"

Otherwise, create a repository of your own through the GitHub UI:

2. Clone the Repo to your Machine
You'll then want to have a version on your machine that you can work on. This is called cloning. To clone a repository to your machine, first you will need to find the repository URL, which can be found in the github repository, under code. You can either clone the repository within this drop down by selecting "open with GitHub desktop"
...or through the terminal in your code editor of choice with:
git clone [repo url]
3. Create a Feature/Branch:
For any edits to a project, it is good practice/form to build the changes on a branch that will then be merged into the the main branch. This helps with version control and tracing changes.
To create a branch in your terminal, you can use the code:
git branch -m "branch-name"
It is useful to think of the -m here as "make". To swap between branches you can use the code:
git checkout "another_branch"
4. Make the Changes to your Branch
You are now at a stage where you can make any changes. Hot tip: in VSCode, Use "Code [filename]" to quickly create a new file in the current filepath.
Once these edits have been made, your branch will be "ahead" of your main. To see a summary of these changes, in the terminal you can write:
git status
This will provide an overview of any changed files that are tracked or untracked. They will be coloured red if they have not been added to your commit queue. To add these files to your commit queue, type the following in your terminal:
git add [file_name]
If you want to add all changes to your commit queue, replace the [file_name] with a period [.] to signal "all files".
5. Commit Changes to your Machine:
Once these files have been added to your commit queue, you now need to commit these files to your repository branch within your system. This acts as one complete change package, or one version update to your code. To begin a commit, type the following in your terminal:
git commit -m "commit message that will be viewable in github"
6. Push these Changes to your GitHub:
Now you have created your commit, you can push these changes to your new branch in GitHub. This solidifies the changes as a published version accessible to the public.
git push origin [branch-name]
This push will publish anything included in your commits.
7. Create a Pull Request
Once you have pushed to GitHub, your next step is Pull the data from the branch, into the main branch of the repository. By selecting the "Compare and Pull Request" option from the banner that appears in your repository after a push, you can view the changes that will be made to the main branch of the repository, as well as title the pull as well and add any comments to the change for other users to view.

8. Confirm and merge the pull request
Finally, confirm that there are no conflicts with your base branch, resolve any conflicts that do arise, and then merge the pull request.

That’s it. Your code is now synced up and live.
9. Delete the Branch
It is good practice to then delete the branch after you have merged it, to keep your repository clean.
git branch -d "branch-name"
A Few Pro Tips
- .gitignore: Before your first commit, use a
.gitignorefile to exclude files likenode_modules,.env, or build artifacts. - README.md: A clear README gives context. What does your repo do? How can others use or contribute to it?
- Commit Often, Commit Clearly: Granular, descriptive commits make it easier to track changes and collaborate effectively.
Commit to the Bit
Publishing your Git repo is more than a push - it’s a commitment to clarity, collaboration, and continuous improvement. Whether it’s a one-off script or a production-grade app, hitting “publish” turns your code into something real.