New to Alteryx? I’ve listed 3 tips that will continue to remain standard practice for myself going forward.
Alteryx is amazingly powerful, intuitive and forgiving, and while I’m yet to explore all its functions and capabilities, there were a few handy tips pointed out to us by experts Chris Love and Andre de Vries during the first three days of Alteryx training.
I’ve summed up a few points with examples below of which I feel could be useful for building up your Alteryx experience and best practice.
1. Add Annotations, Comments and Containers
It is likely that while you are building your workflows, things change, you get stuck somewhere, your workflow becomes massive and most importantly, other people might have to use it later! Therefore, make sure you add annotations, comments and containers to your workflow in a way that others can understand it (so you’re sure you’ll be fine as well the next day 🙂 )
1.1 Annotations, where do I find them?
Some functions have build in annotations, like the filter tool (2.). If they do not show up for you, click on the canvas and turn it on in the workflow configuration – canvas (1.). The default annotation is generated by Alteryx itself, however, it might be useful to change it to be more explanatory. To change the annotation, click on the function, browse to the annotation icon on the left side in the workflow configuration and edit the text in the box provided (3.)

1.2 Adding comments
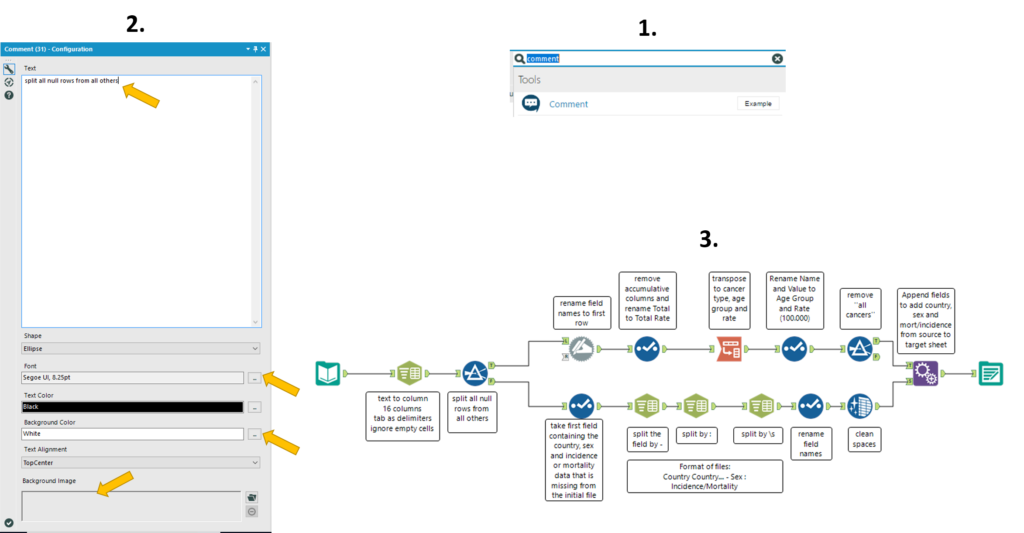
Not all tools have annotations in them, but it might be useful to add comments to them anyway in order to further explain the actions. I found this particularly useful myself when starting off with Alteryx.
The comments toolbox can be found under documentation (or just search it in the top right corner) (1.). You can write, edit, format or even add a background image to the comments (2.). I did go a bit crazy on the comments to highlight the use (3.)

1.3 Containers
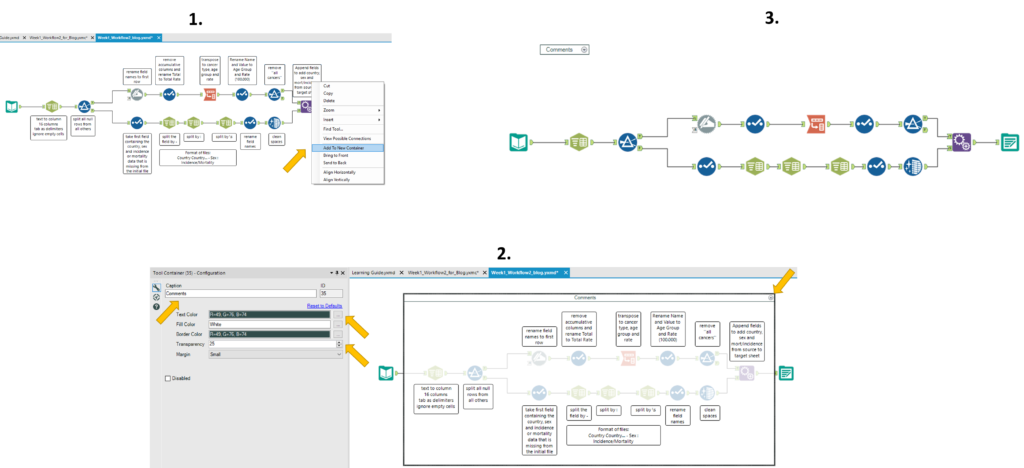
Even though the image above looks a bit crowded, you can add a container around just the comments to hide and show them whenever you want!
Select the comments, right click on a comments – add to container (1.) You can edit the name of the container and format the style and colour (2.). Finally you can hide the container by pressing the minimise button on the top right of the container (2.) to end up with a clean workflow (3.)

You can combine any of the above containers, comments and annotations to mix and match your style of preference. For example containers can also be used to explain groups of tools with one sentence. Furthermore, you can disable your containers individually by selecting the container and tick Disabled in the configuration on the left. This, for instance, can be useful when testing changes to workflows and you want to disable exports or imports.

2. How do I run multiple files through the same workflow?
You created yourself a workflow that works, great! But how do I run through my 100 excel files that all have the same structure?
If you go to input data you can change the import file name in the configuration screen (1.) by replacing the whole filename or parts of it with a * (2.). I’ve tried to explain in 2. what happens if you replace bits of an example file name: Filename_X_Y.txt. Good to note is that Alteryx will go through the folder and look for the names you specified. Furthermore, you can tell it to search sub directories by ticking the box (1.)
If you are importing multiple files I would also suggest to add the ‘Output File Name as Field’ in the configuration (1.). Either as file name only, or the full file path. This can be useful if you later want to know where this particular data came from!

3. Browsing, hotkeys and personalise your layout
3.1 Browse tools
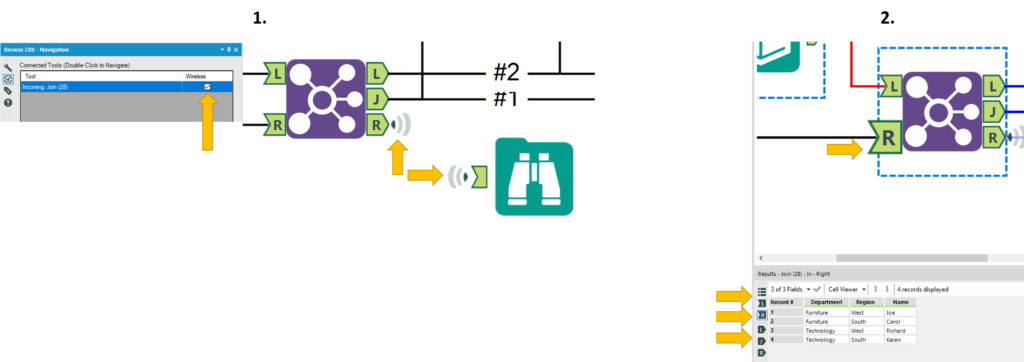
Checking your workflow while building it is common practice, adding browse tools can be an option to do so. But having those connected to your workflow might be something you personally don’t prefer. By selecting the browse to and press the navigation symbol (1.) you can tick the wireless box to create a icon as depicted in 1. on the right.
Then again, in the current versions of Alteryx you do not require a browse tool after each action. As highlighted with the arrows in 2. you can either click the R/L/J of the Join tool and a preview of the data shows up in Results. Likewise, you can press the same symbols on the left side of the Results window to scroll through the input and output data.

3.2 Hotkeys and shortcuts
If you do still prefer browse tools, after clicking on an icon like Join you can press ctrl+shift+b to add browse tools to all ends of the Join. This means you don’t have to drag 3 individual browse tools!
On the topic of hotkeys, I prefer to use as many of them as possible to speed up the process but mainly because my screen is terribly small I hate zooming in and out all the time. The ctrl+r (Run) is another one I use frequently. If you are also keen to start using those or expand on the ones you already use, have a look at the help page of Alteryx on shortcuts and hotkeys.
3.3 Alteryx canvas aesthetics
Last but now least, you can alter the aesthetics of your Alteryx canvas!
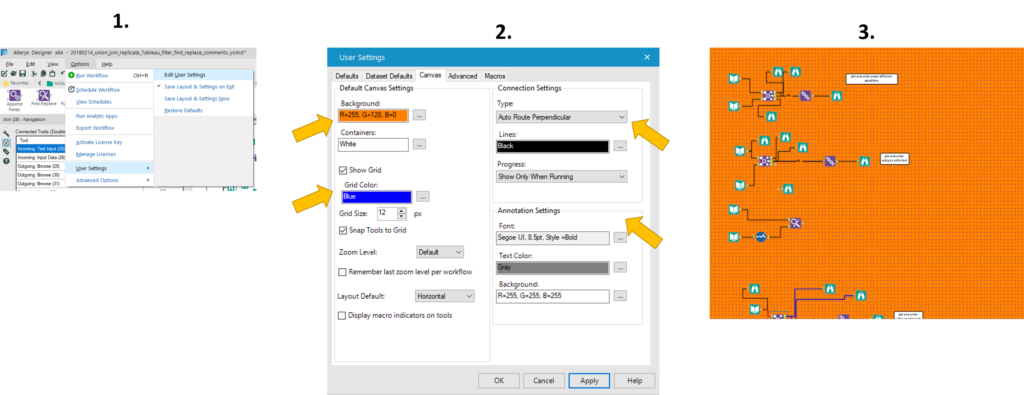
You can access the settings by pressing Option in the menu bar – User Settings – Edit User Settings (1.)
You can edit your background colour, containers, add a grid, change the auto route of connections and much more. Have a play! I enjoy working on a orange canvas with a blue grid (you might have guessed already, I’m Dutch…).

That’s it for now, feel free to contact me about any of the content on Linkedin or Twitter @RobbinVernooij
PS. I tried explaining the content of this post to my cat Soesje (profiterole in Dutch), she was not amused….

