


Getting emails to send straight from an Alteryx workflow is one of those underrated little wins—it makes the whole thing feel polished and complete. But if you’re using Gmail, 2025 came with a twist: Google rolled out new security rules that broke a lot of previously working setups.
If you've tried to hook up Gmail to the Alteryx Email tool recently and hit a wall, you're not alone. Here’s the full walkthrough on how to get around those blocks—plus fixes for the most common error messages.
TL;DR – What You Actually Need
- ✅ Turn on 2-Step Verification for your Google account
- ✅ Personal Gmail → Set up an App Password
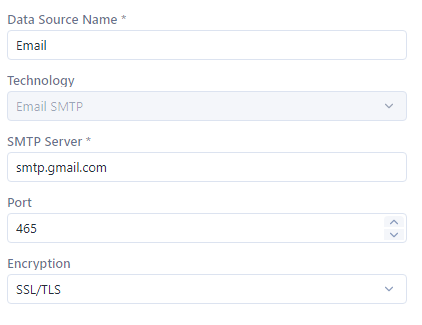
- ✅ Configure Alteryx Email Tool:
- Server:
smtp.gmail.com - Port:
465(SSL) or587(STARTTLS) - Username: your full Gmail address
- Password: App Password or relay credentials
- Server:
- ✅ From address must match what you authenticated with
1. What You Need (and Why)
| Requirement | Why It’s Required |
|---|---|
| Alteryx Designer 2022.1+ | Older versions don’t support updated TLS |
| Gmail with 2FA ON | Google disabled “less secure apps” in May 2025 |
| Network access to smtp.gmail.com:465/587 | Many corporate firewalls block these by default |
| Workspace? | You’ll need an SMTP relay or OAuth. Relay is usually easier. |
2. Gmail Setup (Making It Play Nice with Alteryx)
If You’re Using Personal Gmail
- Go to myaccount.google.com
- Turn on 2-Step Verification (under “Security”)
- Navigate to https://myaccount.google.com/apppasswords
- Create a new app-specific password, give it a name
- Create → Google will give you a 16-digit password. Copy it. No spaces.
🛡 Reminder: As of May 1st, 2025, basic passwords don’t work. If you're still trying to use your regular password, it's going to fail.
3. Setting Up the Email Tool in Alteryx
Once Gmail is ready to go, here’s how to configure the Email tool:
- Connect the email tool from the reporting palette to your workflow
- Under configuration Set Up a Connection
- Create a New Data Source
- Save the Data Source and Connection will appear, input the credentials for your Username and Password. See how to create credentials in next step
- On the left hand side select credentials and new, here you can name the credentials and put it in your email address under Username and the App Generated password created in step 2.5
Pro tip: Add a Select tool right before the Email tool to control what’s sent. If you’re testing, pass in just one dummy row.
4. Quick Test Setup
Try this build:
Input Data → Table →Email
Make sure to add a FROM and TO email and SUBJECT or the email tool will not work
Happy emailing 👋