Background images
I had always wondered how to use background images in a Tableau viz. For this weeks Makeover Monday I decided to give it a go. Here’s what I learnt.
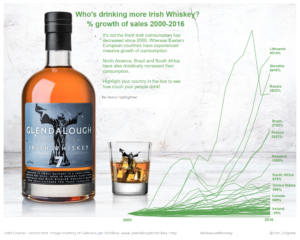
The finished article

This is what I produced for this weeks entry. Now let me take you through step by step how I made it.
1. Plan your chart
Firstly, you should plan your chart. Notice I haven’t said build here, just plan. It’s important here to think about what sort of chart will be most effective and then design how you want it to look. Don’t go looking for images first and then plan your chart around it. It’s important to let the chart do the talking. The image is going to supplement the chart, not the other way round.
2. Find your image
Note that I haven’t build my chart yet. That’s because I first need to find an image that works with the design of my chart. I already know that I want to make a line graph comparing % change since 2000. This plan could be on paper, on Tableau or in your head. Whatever works best for you. I like to sketch things out on paper first. I find it helps separate the design process from the analysis process. Find an image that is relevant to your viz but also one which can add value to the viz. Blank/clear space is important here. You need space for the chart to breathe. If the image and the chart are competing against each other then the eye is dragged around the screen and you won’t achieve what we set out to do.
For this viz I went to Glendalough distillery’s website as this weeks Makeover Monday was in conjunction with them. It is important if you are using other peoples images that you reference them and acknowledge who owns it. A better thing to do if you have the time/skills is to take your own image, that way you can customise it to your hearts content. This image seemed suitable as I have the whiskey bottle and glass, which gives the relevance to the viz, along with plenty of space where the chart can sit.

3. Build your chart
Now we need to build that chart that we planned. It can be anything, line, bar, numbers. Even pies if you’re that way inclined. Here’s my nice and simple line graph. I think it’s important to keep things simple when it comes to using charts with background images. There’s already a lot going on in the final view with the image. So keep things simple and clear to understand in the chart.

4. Add the background image
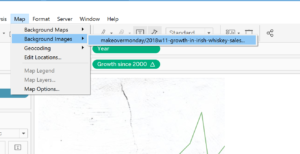
Click on maps > background images > your workbook.

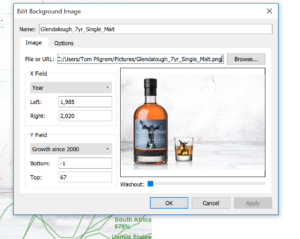
Click on Add image then you should get a dialog box which looks something like this:

How to set up the dialogue box:
- Navigate to the image location
- Make sure the x and y fields in the drop down menus match up with what you have in your chart axis
- Edit the range of values so your chart is contained within the image. Imagine this is now a map. What you are essentially doing here is assigning a latitude and longitude for the image to sit at. For me, my chart starts at 2000 – but I want the bottle to sit to the left of the chart. So you can see that I have added a few years before the chart starts to buffer this. For the y axis – my chart is a % – and the max value is roughly 6000%, which equals 60 in chart language. So I have given a max value of 67 to again add some buffer space where I can position titles etc. Don’t worry about getting this precise at the first attempt, you can go back and tinker with the precise settings later. The important thing for now is to get the chart and image roughly in sync.
- Washout – This determines if you want to fade the image at all. For me I didn’t want to as my chart is appearing over the white space. However, if you have a chart which overlaps some colour, or objects, then you may want to washout the image a little. Have a play around and find what works for you.
5. Format
Now it is time to format around to get the view looking nice. Remove your grid lines and axes. Stick it all on a dashboard and add some labels and titles. Job done – you’ve just made a chart in Tableau with a background image – nicely done!
Hope you enjoyed this tutorial and learnt something new. Any questions or comments please get in touch. Twitter & Linkedin
