


Among the many things we learned during our first official Tableau Server lesson with Jonathan MacDonald, we learned the importance of an often underutilised Server feature, custom view.
In this post, I will go over what custom views are, why they’re super useful aaand hopefully by the end of this post convince you to use them more!
What are Custom Views?
Custom views are like they sound. They are snapshots of a dashboard or sheet that you, the user, choose and save for quick future reference. Custom views are especially useful for dashboards or sheets that have lots of filters and drilling down.
NOTE (edit 10/11/18): Custom views can only be created by those with an Explorer license, but created custom views can be viewed by those with Viewer licenses. Thank you Chris Love for this info!
Let’s try an example. I will be using my UK House Prices viz (data source: Exasol) which I have uploaded onto Server.
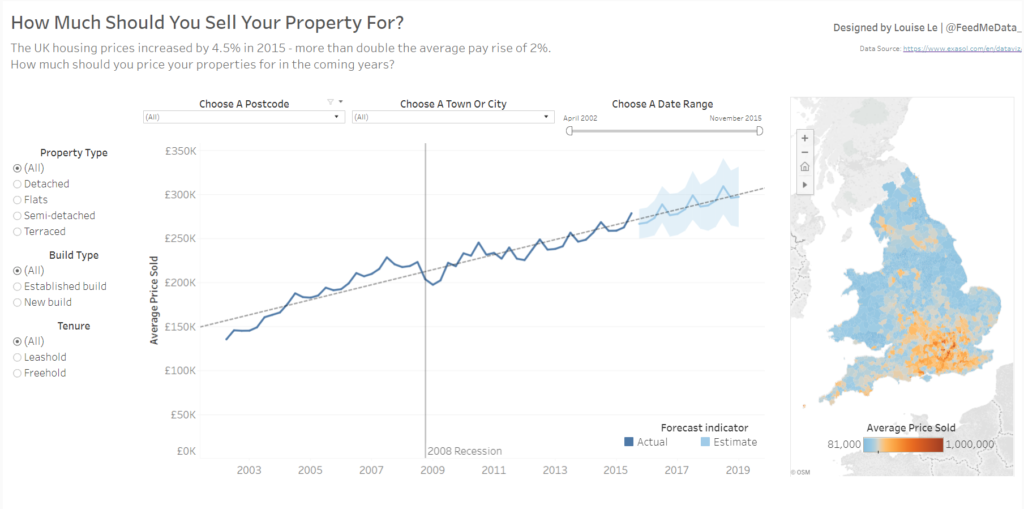
Figure 1. UK house prices viz
As you can see from Figure 2, what we currently see is the original view (see purple box). This is the default view for the dashboard.

Figure 2. View button currently showing Original view
This viz has lots of filters, which makes it a perfect candidate for custom views.
Say you are a homeowner looking to sell your:
- Established build
- Freehold
- Terraced house
- In the postcode SE15
- For a price based on the last 10 years of house sales.
It would be a pain to enter all these filters each time you open the workbook on Server. The view will reset to the original (default) view each time you open the workbook. To open with all the filters you want already applied, you need a custom view.
How to make a Custom View
First, apply all the filters you want to use (I will be using the ones listed above for our homeowner).
Next, click on the ‘View: Original’ button on the toolbar to get the dialogue box shown in Figure 3. Click the box with the grey text, ‘Name this view’, and name your view. I will call mine ‘My Home’. To make this view my default view, tick the ‘Make it my default’ box. If you want other people to be able to see this view you’ve created, tick ‘Make it public’. Hit save when you’re happy.
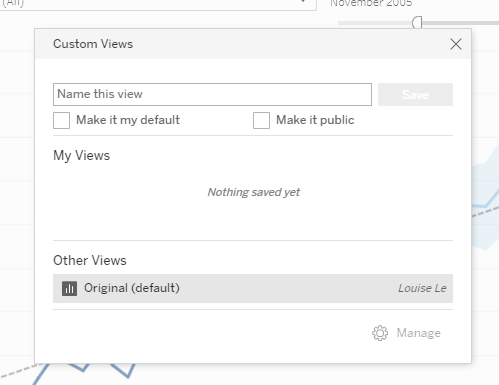
Figure 3. Custom Views dialogue box
Now, instead of the ‘View: Original’ button, you will see ‘View: My Home’ (or whatever you entered as your custom view name. If we click on it, we see the same dialogue box but with updated information (Figure 4). The custom view I just made is shown under ‘My Views’ with a tag to show I’ve made it my default view. Other views we create will be shown under this header too. You can switch back to the original view by clicking on ‘Original’ under the ‘Other Views’ header.
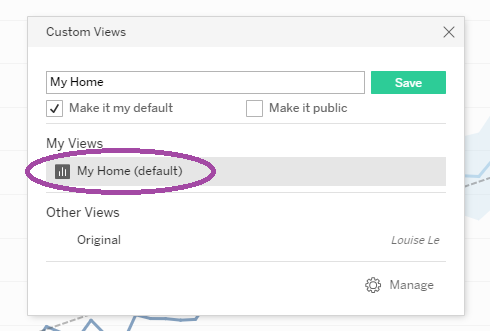
Figure 4. ‘My Home’ is now in the custom view dialogue box
Let’s check this worked by leaving your workbook and opening it again. You will see that your default view has successfully changed to your custom view. We did it!
To summarise, custom views are a way to quickly access the views you’re interested in, instead of having to configure dashboard/sheet filters every time. After all, our homeowner doesn’t want to configure 5 filters every time they want to see pricing for their home.
Try custom views out for yourself!
That’s all, folks!
Louise
Check me out my blog feedmedata and follow me on @FeedMeData_